
photo kime5_zps3df5231d.png  photo kime6_zpsa90859c6.png  photo kime7_zps9d2ef86d.png  photo kime9_zpsb23b4278.png

Friday, March 6, 2015

Make ART Challenge - Stencils

It's that time again...time for the Wendy Vecchi Make ART monthly challenge!  This month the challenge was to use stencils.  And boy, oh boy, did I use some stencils in today's project!  Grab your favorite cuppa and get cozy because today's post is a long one!  (Step-by-step!)
My project started with two pieces of gesso'd chipboard, Wendy's new Spotlight Frames and Mask, embossing paste, and brick stencil.  Using the brick stencil, I added embossing paste to my largest piece of chipboard.  On the smaller piece I knew that I wanted to create a cutout in the middle of the board...that's where the mask comes in handy!
 I placed the mask where I wanted it on my chipboard. 
 Then I layered the brick stencil on top of the mask and adding the embossing paste.
Once the mask was removed, I'm left with a perfectly clean opening!  Yeah!  (How do you like the green tint in my embossing paste?  That's what happens when you never clean your stencils...LOL!  No worries, this baby is getting a healthy dose of paint!)
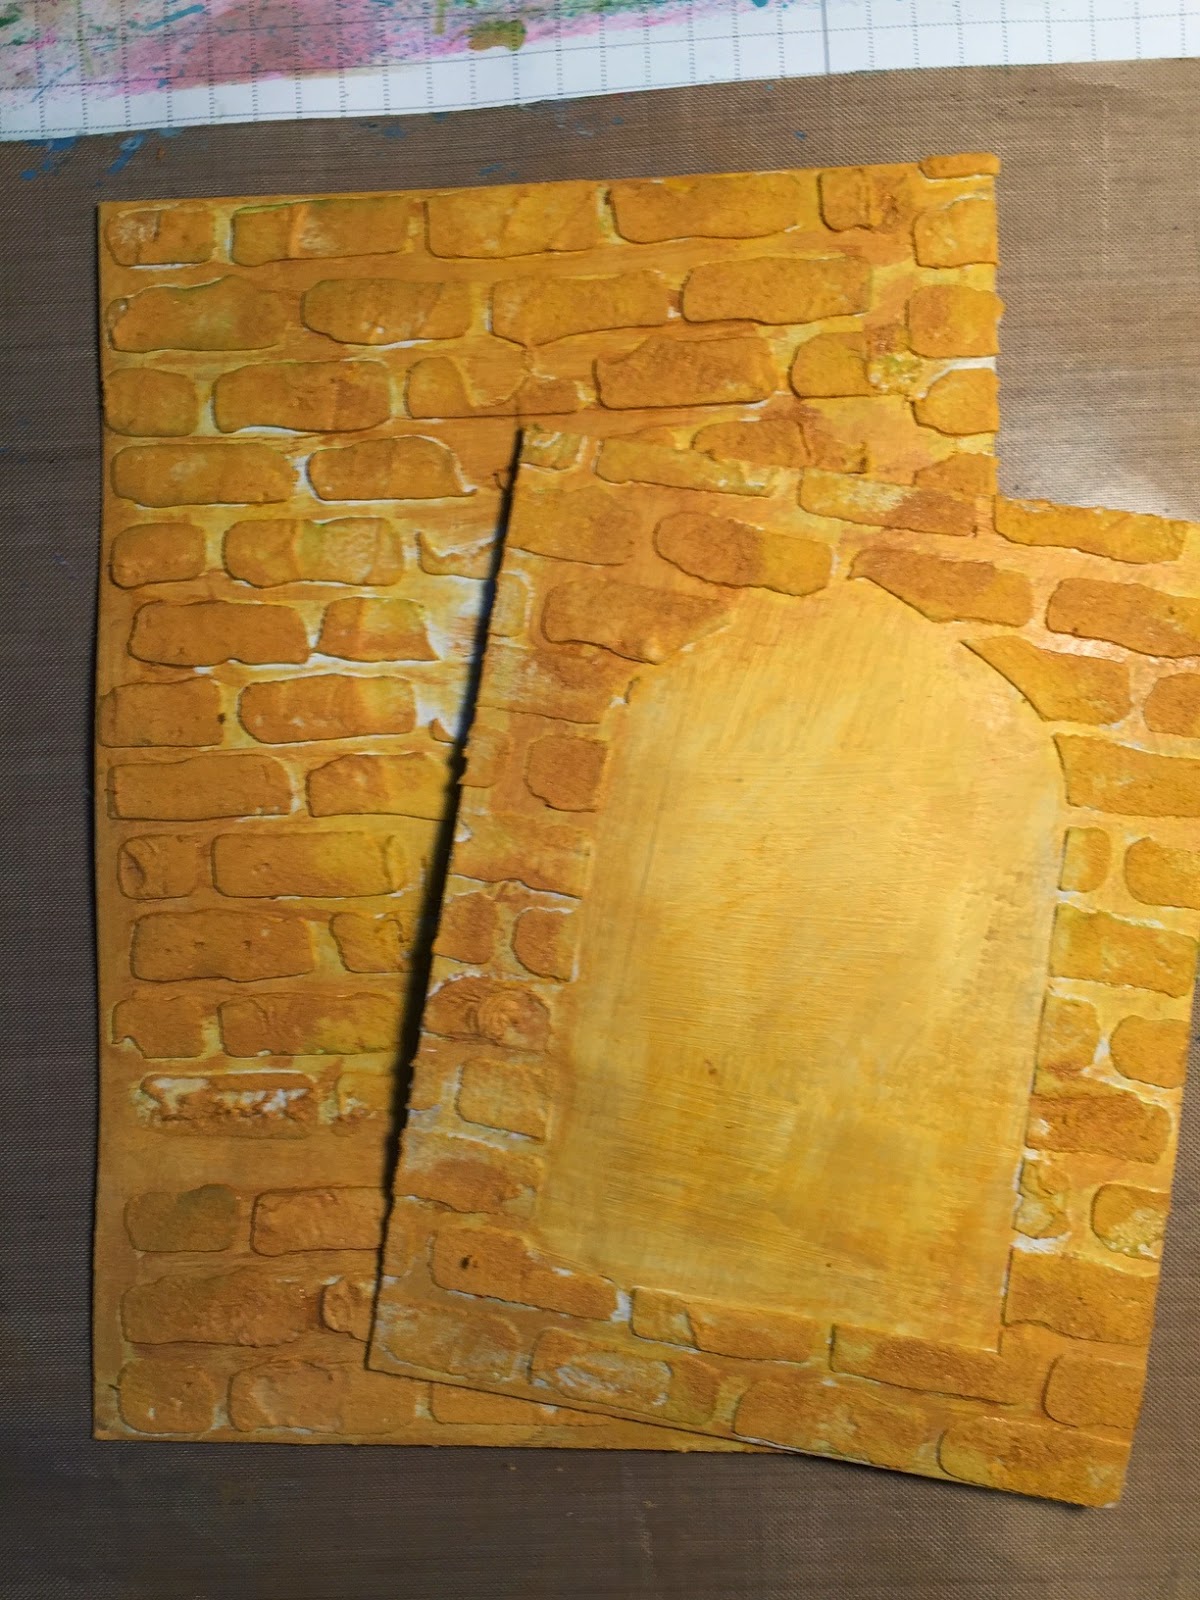
Next came two rounds of paint...Wild Honey and Rusty Hinge Distress Paints.  Dab on and wipe around with a baby wipe...best coverage ever!  (And I like a tiny hint of white showing through...like chipped brick!)
Next...two rounds of Archival Ink..Potting Soil and Watering Can (I'm in love with Watering Can!) These were applied with an ink blending tool.
I used a graphite Stabilo pencil to add some shading to the window frame, Wendy's Mesh background stamp for inside the window, Vines background stamp for...well...vines on the outside of the window and the Tiny Bits stencil for the flowers.

Now here's where things get complicated...I started dinner, emailed Wendy and told her I had a creative block, cleaned the kitchen, got my kiddies in the shower, checked email, ran to the basement a few times to grab more products (yes, I shop from my own store...too frequently...LOL!), and finished my project...all without taking another photo!
Here's the finished piece!  I used Wendy's new Passion for Art stamp set for the face, and License Plate Art for the wish sentiment.  The bird is from the Vintage Floral stencil and the crown and glasses are both Blossom Bucket embellies.  The butterflies are from a Martha Stewart punch and are punched from some scraps I keep on hand for just such occasions.  I also added some stenciling, using the Everyday Words stencil, to the background of my piece.  Oh, and I added a shelf!  You can thank Wendy for that idea...Isn't that fun!  Of course I'm not sure many queens (yes, she's gazing out on her kingdom) store their crowns on a window sill, but perhaps the crow will keep an eye out for thieves and scoundrels who are looking to steal a queen's jewels...

The Make ART Challenge runs until the end of March...and prizes are involved!  Head on over and check out all of the details!  Enjoy!


Wednesday, March 4, 2015

Life Book Week 9

Hi friends!  I'm back with this week's Life Book lesson, which was focused on creating a jar to fill with our favorite things.  Since my mind has lately been on love and being more loving, I opted to make love the theme that my mind focused on during my creative process. It seems that our culture is focused on love being just a feeling when real love is more action than feeling.  Often when we don't feel very loving towards someone our emotions can be helped by doing something loving for that person, even if we don't want to. (Take, for example, responding patiently to our children or spouse when they did the very thing that pushes your buttons.  Not that I'd have any experience responding impatiently...right...)  

Loving actions can actually stir up loving emotions.

I opted to take a portion of 1 Corinthians 13, known as the "love chapter" and focus on the characteristics of what love is and what it isn't.  I started by adding gesso to my watercolor paper and then coloring the paper with a variety of Distress Paints.  I hand drew my jar (with help from a Sweet 'n Sassy stamp set, Get Well Critters..it helps to have a reference!), using a Graphite Stabilo pencil, which smears just enough when water is added.  I then used whatever alphabet stamps I had in my stash to add the words.  The love piece was created by die cutting a shape from the Decorative Plaques set, covering it with vintage paper and more Distress Paint, and then added the grunge board letters. I used a stencil and Wendy Vecchi's Watering Can Archival Ink to add just a hint of flowers.  The birds are from the stencil too...

Last week's jar now has a home on our fridge (hey, adult art can go on the fridge too!) to remind all of us to act loving towards each other and to put away unloving responses and attitudes.


Wednesday, February 25, 2015

Life Book Lesson 8

I confess that I'm a little behind with the Life Book lessons.  I was having a hard time getting my head around lesson 7...had a thought on how I wanted to approach the lesson and then things didn't turn out the way I wanted so this piece of background, shown above, sat on my studio table for a week.  When the lesson 8 class rolled around I realized that my background would be perfect for my boat!  I momentarily let go of #7 and fully embraced #8!

I'm a big fan of designer paper and love the idea of using collage to create a picture.  I was a bit rushed on this project, but it's something I've experimented with before and would like to explore in greater depth in the future.

My background was created by using a brayer to apply a few layers of acrylic paint.  Once the paint was dry, I added the fun clouds, which were created by hand cutting a cloud stencil and then using a make-up sponge and white acrylic paint to add the design.  I also added some white paint speckles all over the entire page.

For the water, I mixed Wendy Vecchi's Crackle Paste with some Tim Holtz Distress Paint and applied the mixture to the bottom of the page with a palette knife.  When it was dry I added a hint of aging around the edges, using Gathered Twigs Distress Ink.
  I hand cut a boat shape and sails from designer paper.  Added some more aging on the edges of each piece and glued my boat to the background.  The mast is a painted wood stick that I used to adhere all of my Tim Holtz rub ons.  I used a white gel pen to add a bit of design.
 I also added some stenciling, using black Archival Ink and a TCW stencil, to the background (before applying the boat), and added a bit more paint over the bottom of the boat so it was in the water instead of on top of the water.  This was a super easy project and "boat" loads of fun to create! **giggle**  The week 9 project looks promising so here's hoping I find some time to play this week!

Monday, February 16, 2015

Family Outing


It's another scrapook page from the "seriously, I scrapbooked?!" series!  This page features photos from a trip that we took as a family.  We ended up finding this great walking/biking trail through the woods and along a river. If I lived in this part of CT, I'd be using this trail every day...it was a great walk and featured tons of fishing spots.  When you have two boys...you have to spend time in the woods so this was a really fun part of our trip (and a great way to let two little boys run for a while!)  After dinner, we hit a mini golf spot and indulged in ice cream.  Perfect end to a perfect day!  I do love the memory keeping part of scrapbooking...maybe I should do it more often...I confess I even purchased a scrapbook album...Humm...

Friday, February 13, 2015

Life Book Week 6


Sharing my latest Life Book project for week 6.  This was a super fun project, taught by Tamara Laporte, even if it made me realize that I'm not a doodler! LOL!  I know some find it relaxing, but I'm far too Type A personality to sit still for long enough to doodle.  So...my piece has the basic outline of some flowers, with minimal doodling.  What I did adore about this piece was the color blocking.  Oh man, those areas of bold, bright colors is just amazing.  I liked the color blocking so much that I created some new journal pages incorporating this idea...will share those once that project is completed.  The one thing I would change about this page is that my black lines need to be thicker.  Time to go on the hunt for a thicker black marker...Hello, Fude Ball?  We need a wider marker tip! (Fude Ball pens really are the bomb for writing over paint...perfection!)

Friday, February 6, 2015

Sweet 'n Sassy Release Day

Hello, sweet friends!   Welcome to the Sweet 'n Sassy Stamps February 2015 Release Day Blog Hop! Baby…it's cold out there, but our February release is sure to warm your heart so grab your favorite hot beverage and get ready to be inspired by the projects created for you by the talented Design Divas!

Release Giveaway!
As part of our release day fun, one random commenter from one of the DT blogs will be selected to win a $10 Gift Code for  the Sweet 'n Sassy Stamps Store.  You have until Thursday, February 12th at midnight EST to leave your comments.  The winner will be posted on the Sweet 'n Sassy Stamps Blog on Friday, February 13th!

Below are the cards I created with February's new sets!  First up, Winter with Winnie (how hysterical is that sentiment!)
 Next is another Winnie set, Winnie's Warm Wishes.  This card also features the new Keep in Touch stamp set (the background features many of the sentiments included in the set).
My favorite this month, Get Well Critters.  Feeling fowl?  Snicker...
Loved this set so much...had to make a second card!
One more thing before we let you go...

We can't forget our fun Release Day Challenge!
Since the cold winter month of February often brings with it a case of the sniffles, create a warm get well card and join our...
"Warm Get Well Wishes Challenge"   

Just a few guidelines to remember as you play:

            
- You don't have to use a Sweet 'n Sassy Stamps image to enter (although we sure love when you do!)
- Please create a NEW card (no back linking)
We ask that you enter your card in no more than 3 challenges
 - You'll have until Thursday, February 12th at midnight EST to enter

- We'll draw 1 winner from this week's challenge to receive a $10 credit to the Sweet 'n Sassy Stamps Store!  
If there are 25 participants, (not including the DT), we'll draw 2 winners!
- Please use code SNSFEB2015RC when uploading to Splitcoaststampers or other galleries 

To enter simply share a link to your creation below!

Thanks for joining us today!  Be sure to join us again on Friday, February 13th to see if you've won!

 Now it's time to see what the DT has created with these fabulous products!

February Make ART Challenge - Hearts

Hi folks!  I'm back with a project created for the latest Wendy Vecchi Make ART Challenge!  This month's challenge is to use hearts on a project...you know, to celebrate LOVE!

I started my card by created all of the individual pieces....(All of the images are from the My Kind of Art stamp set).  The pitcher is embossed with Cornflower Blue embossing powder; Gathered Twigs has been added to the edges.  The heart is a mix of Dina Wakley acrylic paint and Wendy's Crackle Paste.  (Isn't that crackle delish?!)  The flower was stamped twice and colored with watercolors.  I cut out one entire flower and then a portion of the second flower, to create multiple flower layers.  A button with twine finished the flower.

My card background is a piece of vintage book text, covered with a bit of Gathered Twigs ink and Wendy's tiny cross stencil.  I then layered a piece of designer paper, with an oval die cut, on top of the text paper and then added a black frame, created using two Spellbinder oval dies.  Each little scallop on the frame got a silver dot, thanks to a gel pen.  I also added Gathered Twigs over the edge of the entire card and added some faux stitching, from Wendy's Just Sew Artsy stamp set.  Finally, I added the sentiment and a star (from the Little Bits stencil).  Viola!  Hope you enjoyed today's card and be sure to check out this month's challenge!