photo kime5_zps3df5231d.png  photo kime6_zpsa90859c6.png  photo kime7_zps9d2ef86d.png  photo kime9_zpsb23b4278.png

Tuesday, April 30, 2013

Be Brave

Happy Tuesday!  This week's mantra is be brave!  Be brave in trying new techniques, be brave in trying new products, and be brave is stepping out and doing some things that you may not be all that comfortable doing...like recording weekly videos!  Yup...I've taken the plunge and am going to be doing my best to post weekly videos on the new eclectic Paperie You Tube channel!  Glup!  I'm a bit nervous as I tend to get too tense when I know the camera is rolling and then I'm full of  "ums...." as I try to remember what I wanted to say! LOL!

However, I have two new videos posted...one showing how I used Faber Castell Big Brush Markers to create the shading on today's flowers, and another (which I posted last week) demonstrating a gesso resist technique
So...Big Brush Markers...they're a blast!  I've been having so much fun playing with them again...I bought them about two years ago and they've been sitting in my studio ever since, mostly because I didn't know what to do with them!  I'm just learning, hence the simple video, but am hoping that as I learn I'll be able to share my ideas and techniques with you!
 
As for today's card, it was actually created for last week's Mix-ability challenge on Splitcoast.  The challenge was to use pen in some way on your project.  I started by using Dylusions Ink Sprays on a piece of cardstock and then stamping the Poppy Background stamp (a Donna Downey design) onto the sprayed paper.  (Oh, I also used the new Quartrefoil stencil with the White Linen spray on the background, before the stamp!)  Then I got to work with the Big Brush Markers, coloring in those beautiful flowers.  Once my coloring was done, I went back with a fine tip marker and re-sketched the outline of the stamps and added some sketch lines to the insdie of the flowers...to give it that hand drawn look.  I also added some doodles around the edge of the card and traced the sentiment (from teh She Sprouted Wings stamp set) onto a piece of vellum.  I then mounted this big 'ol card (it's almost 7" x 4") onto a piece of white corrugated cardstock (from Fancy Pants) and added some pick buttons to finish everything off!
 
I hope you have a moment to stop by and follow the eP You Tube channel and let me know what you think of the videos.
 
Enjoy!

Thursday, April 25, 2013

Gesso Resist Posts

My goodness...how is it even possible that it's been so long since I've posted on my blog?!  My apologizes for being MIA for such a long time!  Last week was a whirlwind of activity, with me attending three days of a retailer show about an hour from my home.  I attended a boatload of super exciting classes, along with a day long Ranger training with Dyan Reaveley and Tim Holtz...fun times!

Today, I actually have two posts...on two separate blogs!  The first, shown above, is a project that I completed for the eP blog and the second, shown below, is for the Sweet 'n Sassy blog.
 Both projects showcase a gesso resist technique, which I first saw demonstrated by Claudine Hellmuth during the winter CHA show.  Tim took that technique and combined it with Distress Stains...the end result was divine!  Visit each blog to read more about it or you can check out the video I created showing you how to do the technique...super easy!

Enjoy!

Monday, April 15, 2013

The Courage to Imagine

I'm in love, and I mean in love, with my art journal, acrylic paints, and rub ons!  I find that I spend time during the day thinking about what to try next, as I'm still in the learning and experimenting phase, and trying to find the time to try out my ideas.

I will share that I'm so thankful to Donna Downey and her weekly videos.  They have been a great source of inspiration and have even helped me get over those times when I'm not sure what to do next.  The biggest thing I've learned is that if you're not happy with how your page is turning out...you can just cover it up!  I'm always amazed that Donna's pages turn out so differently than how she started...it's all about those layers!  I also feel like I have a giant product wish list started that has continued to grow but I'm trying to add to the stash slowly and make due with what I have on hand. 

Today's project was quite a journey...one that took me about two weeks to complete...Here's how it started...
Last week Sweet 'n Sassy released this great Poppy Background stamp.  This is one big 'ol flower stamp...probably 4" in diameter.  My pages started with one idea and finished quite differently than I originally intended.  My initial though had been to do more of a watercolor affect but I ended up diving head first into my acrylics.

I started by using VersaMark ink to stamp the Poppy Background image multiple times across two journal pages.  I then embossed each flower with white embossing powder.
I then used Distress Paint (Bundled Sage and Broken China) to color in the top and bottom portions of the pages.  Since Distress Paints are very fluid, I was able to use water to move the paint around the flowers.  I then used Adirondack Paint Dabbers (Mountain Rose and Cranberry) and water to paint the flowers.  Since the embossing resists the paint, I was able to maintain the lines of the flowers.

And then...I got stuck...I added some embossing paste, using the Turkish Grunge stencil, and then I used Dylusions Ink Sprays and a different stencil and this was my thought, "well, I ruined that page..."  I hated the look (sorry I didn't take a picture of the ugly pages) and really didn't know what to do with the pages so I set my journal aside and spent about a week thinking, going in to peek at the pages again to see if I still disliked the look (yup), and checking out some other art on Donna's blog.  And then...an idea developed...I needed to cover up these pages with more paint!
 So that's what I did!  I went plum crazy with paint!  I grabbed a bunch of paint dabbers (Bottle, Lettuce, Denim, Pool, Aqua, Willow, Pitch Black, Snow Cap, and Sunshine Yellow), a paper plate, a paper towel, and I got to work!  Notice I didn't mention a brush...that's because I did the whole background with my fingers...love that!  Looking at the piece as a whole I can tell that I still need to work on blending the darker colors into the background more but once I added the paint, covering up my stencil work, I was so much happier.

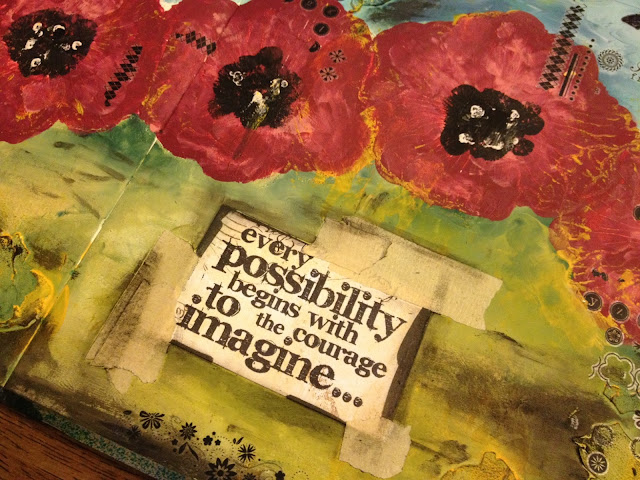
And then I even covered the poppies!  I was able to use the stamped, embossed image as a guideline for where to paint the poppies and, as you'll see in the photos below, you can still see the embossed lines.  I also love the look of the paint covering the embossing paste.  The last thing I did was add black to the edges of the pages.  Black just does something to bring everything together.
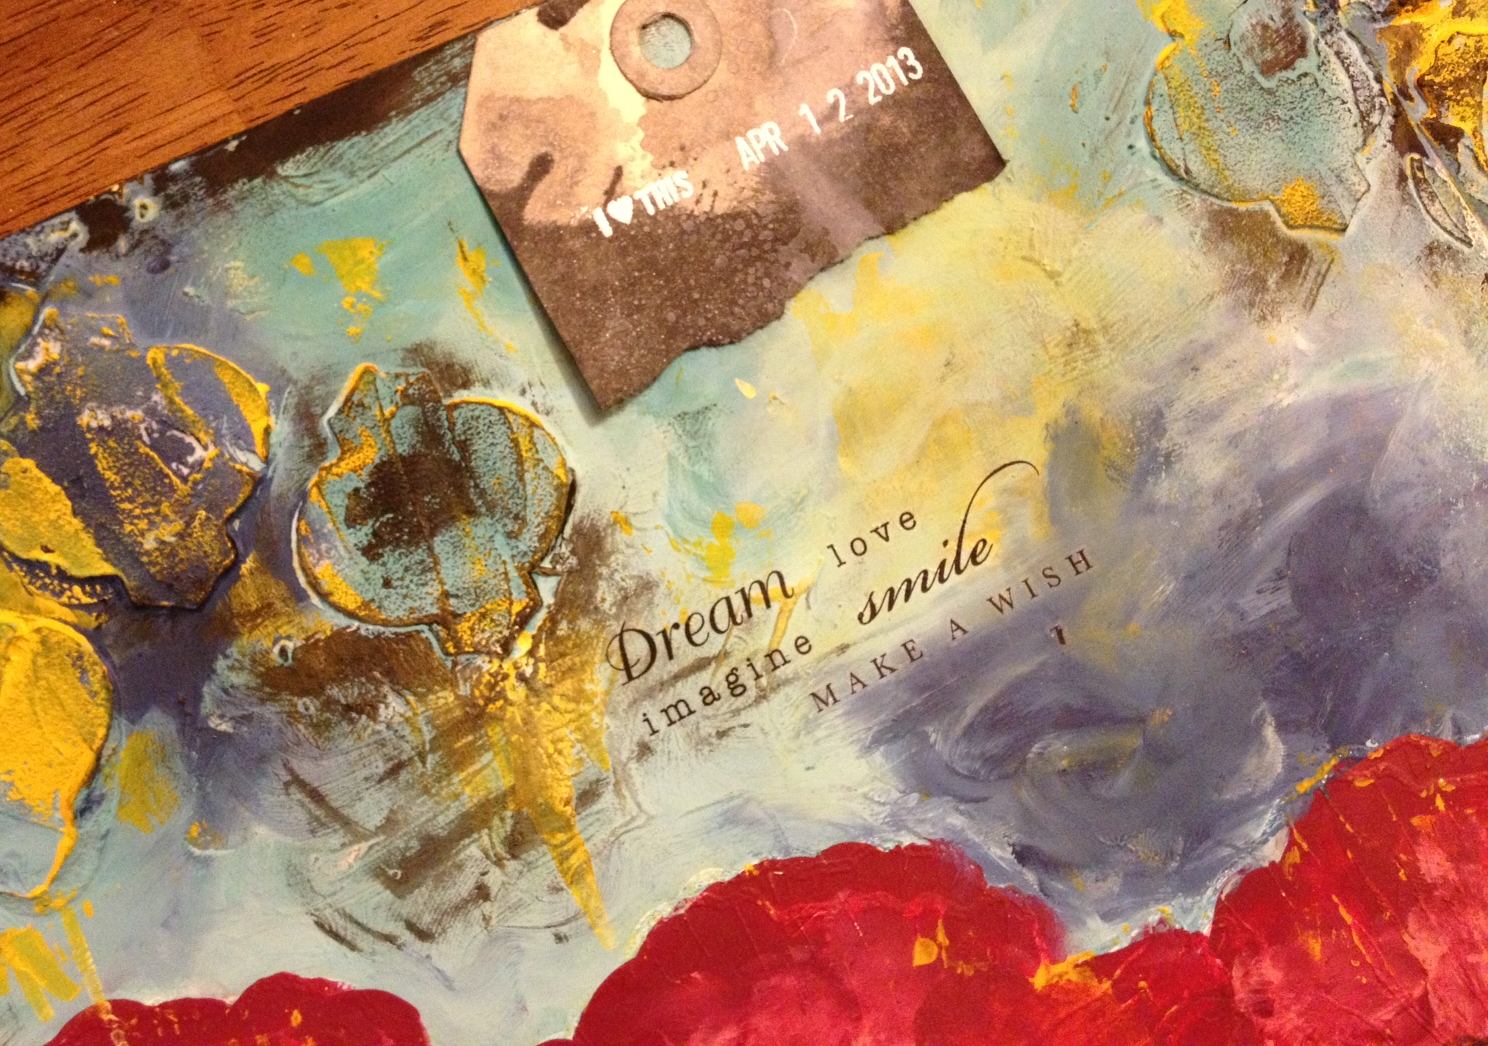
 Here's a close up of the flowers, where you can see the embossed lines.  I also used a whole bunch of rub ons that I've had in my stash forever.  These are all from my Stampin' Up days...so they are old!  I even like to just rub on a portion of the image, very vintage.
Here are some more of the rub ons and the great embossed pattern with the paint...swoon...I love it!  I also love the portion of the tag I added (this is totally a Donna thing), which was created by my nine-year old.  He loves paint and tags and a few months ago we spent a day just playing, this is one of the tags he created.  There's even a little #2 up in the corner where he was keeping track of how many tags he made.  I love that there's a tiny bit of his creative work on these pages.

The date stamp is from the Smashed book product line and I love how it has little sayings to go along with the date.  I embossed the date in white so it would stand out on the dark tag.
Here's the top of the second page, with more fabulous rub ons...love that giant Life is Good up in the corner.  I also added a few butterflies from one of Sweet 'n Sassy silhouette stamp sets (you should check them out...she has the best silhouette images...love them!)
I I ended my piece by stamping this Tim sentiment on a piece of designer paper.  I attached the sentiment with 3-in-1 glue and then added the pieces of masking tape (another Donna technique).  I really need to get my hands on some washi tape but I got nothin' so I went with the masking tape and I do really like the contrast.  The black lines came from a Faber Castell Big Brush Marker.  These markers stay wet for just a few seconds, giving you time to spread the color.

A few things I noticed after I finished my page and went back through my older pages...I've been using the same color pallet, images, and sentiments too frequently.  It's where I'm comfortable and I think creating the same type of look over and over again is typical of someone who is just learning...you stay with what you know or what you've recently learned.  But it's time to step out of the box and try something new...I'm looking forward to the next adventure...

Happy Crafting!


Wednesday, April 10, 2013

Sweet 'n Sassy Release Week - Mini Tags and Sentiments


Hi all and welcome to the last day of the Sweet 'n Sassy release week celebration!  Hasn't this week's release been amazing?!  Such a wide variety styles and designs...Love, love, love!  Today we're sharing the Mini Tags & Sentiments stamp set and coordinating dies.  (We are also releasing a darling new silhouette set, His Child, shown below.  And I'll have a card to share using this set next week!)

I am in love with tags, especially these wee little ones that are so perfect for cards and gift tags.  I wanted to include a lot of white and color for this card to I used the dies to cut out a whole bunch of tags and then got to work with my Distress Inks.  I stamped each of the tags in a different color and then came back and added a bunch of the sentiments.  I then added matching twine, and attached the tags with foam tape to the card base.  Then I just needed a finishing 'friend' sentiment on the right.  Fun stuff!  More info on this great new set below!


  • Stamp set includes 8 images & 37 interchangable words
  • Set measures approximately 4" x 6"
  • Round tag measures approximately 1"
  • Designed by Korin Sutherland
  • Coordinates with Mini Tags Die Set
  • Stamp set is priced at $15
  • Die set includes 8 dies
  • Round tag measures approximately 1 1/8"
  • Die set is priced at $11.75
  • Get them both for $24 when you purchase the Mini Tag Bundle available for a limited time!
And here is the so sweet His Child stamp set, which was designed by Dina Kowal.


  • Stamp set includes 3 images & 5 sentiments
  • Set measures approximately 4" x 6"
  • The first sentiment measures approximately 1 3/8" x 3"
  • Designed by Dina Kowal
  • Stamp set is priced at $15 

Check out some of the fabulous samples made by our talented DT in the thumbnails below.

Be sure to leave a comment of each of the blogs along your journey because we're giving away both of these fabulous stamp sets to one lucky commenter!  
 
The deadline to comment for a chance to win is midnight EST Wednesday, April 10th.  The list of winners will be announced on our website homepage by Thursday, April 18th.

Thanks so much for joining us!  Enjoy the hop!! 


Monday, April 8, 2013

Sweet 'n Sassy Release Week - Precious Poppies


Hello and welcome to day three of the Sweet 'n Sassy release week celebration!  We're now to that set that makes me swoon...as floral sets always do.  I am in love with this stunning set and wait until you see the coordinating Poppy Background stamp, shown below, love!!

My card features the Precious Poppies set (the full set can be seen below) and I decided to stamp on a piece of sticky back canvas for this card.  I used archival ink to stamp on the canvas and then colored the poppies with Distress Markers.  (Using a watercolor brush helped to blend the colors)  I used a bunch of scrap papers for the background of the card (that map paper rocks!  It's from Heidi Swapp!) and some embossed kraft cardstock.  Isn't canvas a fun material for stamping?

I hope you enjoyed today's card and be sure to check out all of the set and blog hop details below!


  • Stamp set includes 3 images and 17 sentiments 
  • Set measures approximately 8" x 6"
  • The large group of poppies measures approximately 4 1/2" x 3 1/8"
  • Designed by Korin Sutherland
  • Stamp set is priced at $26 

  • Includes 1 large image
  • Measures approximately 3 3/4" x 3 3/4"
  • Designed by Korin Sutherland
  • Stamp set is priced at $15 
Check out some of the fabulous samples made by our talented DT in the thumbnails below.

Be sure to leave a comment of each of the blogs along your journey because we're giving away both of these fabulous stamp sets to one lucky commenter!

The deadline to comment for a chance to win is midnight EST Wednesday, April 10th.  The list of winners will be announced on our website homepage by Thursday, April 18th.

Thanks so much for joining us!  Enjoy the hop!


Sunday, April 7, 2013

Sweet 'n Sassy Release - Script Birthdays

Welcome to our next Sweet 'n Sassy release day...Today we're featuring two lovely sentiment sets, all focused on wishing your friends and loved ones a very happy birthday!  You can see the full set and set details below, along with my project.
 
  • Stamp set includes 17 sentiments 
  • Set measures approximately 4" x 6"
  • The first sentiment measures approximately 1 3/4" x 7/8"
  • Designed by Korin Sutherland
  • Stamp set is priced at $15  

Since this set is featured sentiments, I wanted to really create some fun design on the card so...I took out my Gelli Plate and got to work!  (Don't have a Gelli Plate yet?  Ummm...you need one, trust me, you really do!  You can see a video on using the product here.)  I used a bunch of acrylic paints and three stencils, Spring Fling, a Hexagon design, and Cursive Alpha) to create the design and then I cut out a portion of my print and attached it to a manila tag.
Next I selected which stamps I wanted to use to create my birthday sentiment.  You know what I love about this set?  You can mix and match the words to create a custom saying.  I stamped my wishes on a piece of text paper (can you tell I like text paper?  Yeah...I might have gone overboard...LOL!) and then assembled my card!

Hope you liked today's project and be sure to check out the other set released today, along with details about the hop and links to the other DT blogs!
Also released today is the Birthday Innies stamp set!  Be sure to check out the links below for cards featuring this set!
  • Stamp set includes 5 sentiments 
  • Set measures approximately 6" x 4"
  • The first sentiment measures approximately 3" x 1"
  • Designed by Korin Sutherland
  • Stamp set is priced at $15 
Check out some of the fabulous samples made by our talented DT in the thumbnails below.

Be sure to leave a comment of each of the blogs along your journey because we're giving away this adorable stamp set to one lucky commenter!  

The deadline to comment for a chance to win is midnight EST Wednesday, April 10th.  The list of winners will be announced on our website homepage by Thursday, April 18th.

Thanks so much for joining us!  Enjoy the hop!