photo kime5_zps3df5231d.png  photo kime6_zpsa90859c6.png  photo kime7_zps9d2ef86d.png  photo kime9_zpsb23b4278.png

Friday, April 10, 2015

Sweet 'n Sassy Release Day

Hello, sweet friends!  Welcome to Sweet 'n Sassy Stamps 

April 2015 Release Day!  Let's face it…we all need help with those masculine cards for the special men in our lives!   Our Sweet 'n Sassy Stamps Release this month is full of new stamp sets and dies that will make those masculine cards a snap!  Not only that, but  our new Retirement and Graduation sets will also fill a void in our stamping collections!

Introducing our April 2015 Release

Camping Fun: $15
  • Stamp set includes 7 images and 6 sentiments
  • Stamp sets measures 4" x 6"
  • Camp site image measures approximately 3 1/2" x 2 1/4"
  • Designed by Korin Sutherland
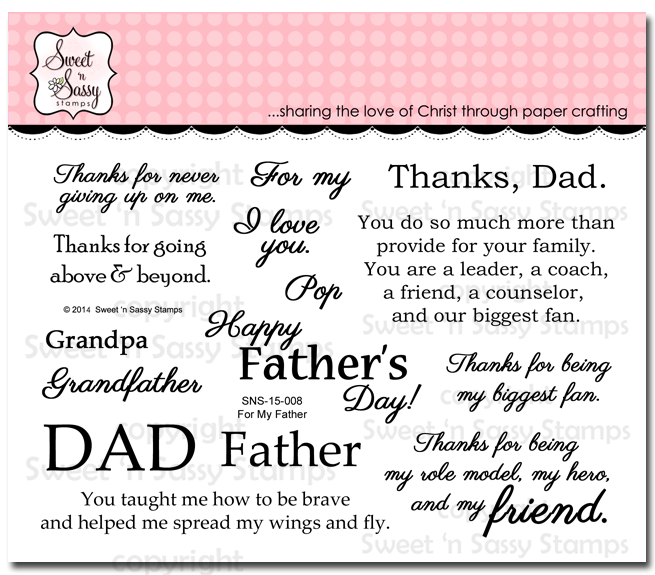
For My Father: $15
  • Stamp set includes 15 sentiments
  • Stamp sets measures 6" x 4"
  • The DAD sentiment measures approximately 1 1/2" x 1/2"
  • Designed by Korin Sutherland
Retirement Sentiments: $15
  • Stamp set includes 12 sentiments
  • Stamp sets measures 6" x 4"
  • The Happy Retirement sentiment measures approximately 3" x 3/8"
  • Designed by Korin Sutherland
Hole in One: $11
  • Stamp set includes 1 image and 12 sentiments
  • Stamp sets measures 4" x 4"
  • Golf image measures approximately 1 5/8" x 1 7/8"
  • Designed by Korin Sutherland
Mr. Fix-It: $11
  • Stamp set includes 1 image and 13 sentiments
  • Stamp sets measures 4" x 4"
  • Golf image measures approximately 1 5/8" x 1 7/8"
  • Designed by Korin Sutherland

That's not all…the new items released for the April Sweet Perks Bundles are now available separately at the Sweet 'n Sassy Stamps Store!
Super Dad: $9
  • Stamp set includes 2 images and 11 sentiments
  • Stamp sets measures 3" x 4"
  • Super Dad image measures approximately 2 7/8" x 2 7/8"
  • Coordinating die set includes 2 dies
  • Designed by Korin Sutherland
Congrats Grad: $9
  • Stamp set includes 2 images and 6 sentiments
  • Stamp sets measures 3" x 4"
  • Diploma image measures approximately 2 1/4" x 1 1/4"
  • Coordinating die set includes 2 dies
  • Designed by Korin Sutherland

Finally, we have one die set now available that coordinates with one of our popular stamp sets…Buggin' Ya.  

Now what are you waiting for…head on over to the Sweet 'n Sassy Store to grab a few of your favorite masculine sets! 

Thanks for joining us today!  Be sure to join us again on Friday, April 17th for our April 2015 Release Blog Hop & Challenge!

Wednesday, April 8, 2015

Sharing on eclectic Paperie Blog

I've been posting some projects on the store blog and today I'm sharing this Finnabair inspired project.  Hop on over to the eclectic Paperie blog and check out all of the details!

Monday, April 6, 2015

Life Book Lesson #13

A short and sweet post today...sharing the next Life Book lesson.  Last week's lesson was on creating a field journal, or creating a project based on something found in nature.  Since it's still freezing here in New England (will it ever get warm?), I decided to grab some shells that I had on a shelf at home and draw them, while dreaming of warmer days.  I kept this entire project pretty simple as I really liked the final look of the watercolors (oh, how I love working with watercolors!), and opted to just added a quote (from Ali Edwards).  This project did make me want to create an entire journal dedicated to watercoloring...maybe something to start this summer...

Thursday, April 2, 2015

Sweet 'n Sassy Guest Post

I'm hanging with the Sweet 'n Sassy team today...Head on over to the blog to check out the details on today's card...

Monday, March 30, 2015

Life Book Lesson 13

It's time for another Life Book project!  And this one is by far one of my favorites!!  The lesson was taught by Juliette Crane.  I have a feeling that she's going to quickly become another one of my favorite mixed media artists.  Her work is all flowy and free form and she has a way to making drawing very accessible to those of us who are "drawing challenged."  For example, all of her animal drawings start out the exact same way...a circle and a rectangle.  Yeah, I think I can get behind those directions!

The other thing I loved about her work was how much she painted with her hands.  Finger painting is for me!  I'm will absolutely never be a fine artist...I simply don't have those natural talents nor the time to develop them, but give me some paint and no real rules?  Now that makes me happy!

This painting started with a background that I randomly covered with four different colors of paint.  (I used Dina Wakley's paint...love 'em!)  I then used the same four colors and started adding more paint with my finger tips...I just globbed and smooshed paint all over (oh, and I did add a bit of tissue paper first).  Then I added some darker blue around the edges, a touch of white, and the yellow for the moon.
The owl and branch was drawn with a Stabilo pencil and then I added paint (using my fingers and a palette knife).  I did need to go over the lines of my drawing a few more times and then I would activate the pencil with a water brush.  Just check out all of that gorgeous texture on the owl...it's dreamy!  I added a tiny bit of text stamping and then hand stamped by verse.  Unlike last week's lesson, which took me almost two weeks to complete, this project was finished in one evening.  I may go back and add a few more details (I'm always afraid of doing too much so I need to "sit" with this for a few days), but I just loved Juliette's style and I am definitely going to create more whimsical creatures...I can hardly wait!
 

Saturday, March 21, 2015

Love You Scrapbook Page

Today, I'm sharing another project from the "I can't believe I scrapbooked" series! (Seriously, I probably won't scrapbook for another five years! LOL!)  And can you believe this photo?  It's from my honeymoon...16 years ago!  Check out that hair...oh yeah, baby...

My hubby and I got married just five months after our first date (it was love at second sight), and not wanting to wait to save the cash for a big wedding, we ran off to Monterey, CA with only my brother and sister-in-law in tow!  (We also had some good friends fly out to attend the wedding)  Our sweet wedding was followed by two weeks in northern CA...it was a blast!  This picture was from the end of our stay...exploring around the Golden Gate bridge.
I love chipboard pieces and little banners...
 Me and my hubby in all of our youngness....sigh...it goes by too fast!

It only took me 16 years to scrapbook one photo from our honeymoon...I wonder what's next on the list... 
 

Thursday, March 19, 2015

Life Book...Hard Lessons

My next Life Book project...the lesson that took me over two weeks to complete.   This baby was hard work...so much so that I almost gave up.  (Notice my quote...)

The lesson was from the super talented Jane Davenport.  I adore her work, love her faces...oh, her eyes are divine, but I could not...for the life of me...seem to draw anything even remotely close to a "Jane" face.  I even tried to trace...for a bit of practice and it was a disaster.  It was if I had never drawn a face before!  UGH!  Frustrating!  I think that I tried five or six times before I decided to give up and try something completely different.

I'm in the middle of reading Pam Carriker's book on face drawing and I opted to follow one of her lessons for drawing my face.  Ahhhh...it was just what I needed...to completely change direction.

This project started with collage.  I added pieces of designer paper and vintage text paper to a 9"x14" piece of cold press watercolor paper.
Next, my face was actually drawn on a separate piece of watercolor paper and colored with a combination of gelatos and watercolor pencils (following Pam's tutorial, which was super helpful on shading)  Once the face was completed, it was cut out and attached to the collaged page.
(You can see my failed drawing attempts over on the left hand side...sigh...)  Once my face was attached, I hand drew the neck and shoulders.  Then...this is the really fun part...I applied gesso to the entire background, with the exception of the face, neck, shoulders, and hair.  Loved this part of the project!
  Gesso also does much to cover up all mistakes (I love gesso...)!  I used more gelatos and paper to color the neck, add shading, and give her some clothes. (Isn't the hair totally fun!)  The entire piece was lightly outlined with a Stabilo pencil for shading.  I added some lines to her hair and a whole bunch of butterflies to her head...fab headband!  I also added a tiny bit of stenciling around the entire page. And then...my sentiment on perseverance was stamped with individual letter stamps.   So happy to have this project finished!
 And guess what I did after I finished?  Bought Jane Davenport's book...yup...I'm going to learn how to draw her eyes if it's the last thing I do with art! LOL!  Here's to persevering!!