photo kime5_zps3df5231d.png  photo kime6_zpsa90859c6.png  photo kime7_zps9d2ef86d.png  photo kime9_zpsb23b4278.png

Friday, March 13, 2015

Sweet 'n Sassy Release Party - March 2015


Hello, sweet friends!  Welcome to the Sweet 'n Sassy Stamps March 2015 Release Day Blog Hop & Challenge!  The days are getting longer, the weather is changing, and Spring is on the way!  Who doesn't love watching for the first signs of spring after a cold and snowy winter?  Sweet 'n Sassy Stamps will help set the stage for Spring with three new Mini Flower Block stamp sets ...AND for you animal lovers out there…two new stamp sets featuring our favorite canines and felines!  So get prepared to be inspired by the projects created for you by the talented Design Divas! 

Introducing our March 2015 Release
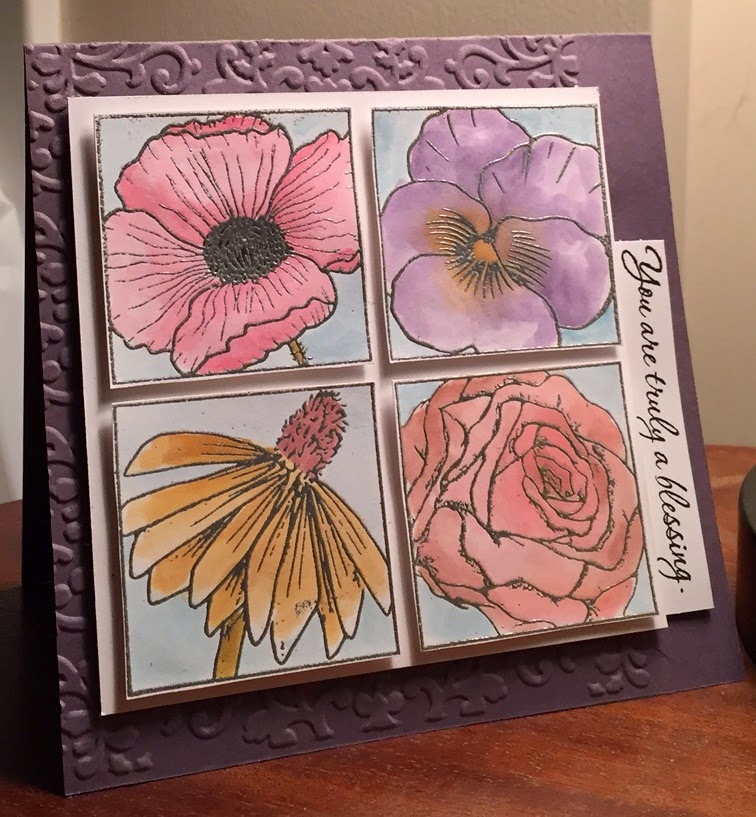
Mini Flower Blocks 1 Clear Stamp Set: $11
 Mini Flower Blocks 2 Clear stamp Set: $11
 Mini Flower Blocks 3 Clear Stamp Set: $11
-Stamp set includes four images
-Stamp set measures 4" x 4"
-Each flower block measures approximately 1 7/8" x 1 7/8"
-Designed by Korin Sutherland

-Stamp set includes 13 images and 12 sentiments
-Stamp set measures 6" x 8"
-Begging Golden image measures approximately 2" x 1 1/2"
-Designed by Korin Sutherland


- Stamp set includes 12 images and 16 sentiments
-Stamp set measures 6" x 8"
-Fluffy Kitty image measures approximately 1 3/4" x 1 1/2"
-Designed by Korin Sutherland
 ********************************************************************
  That's not all…the new items released for the March Sweet Perks Bundles are now available separately at the Sweet 'n Sassy Stamps Store.  Click over to the SNSS store or to the blog to read more about the additional sets and dies!

Release Giveaway!
What would a release be without a giveaway, right?  Well, here are the details of this month's release prize. One random commenter from one of the DT blogs will be selected to win a $10 Gift Code to Sweet 'n Sassy Stamps.  You have until Thursday, March 19th at midnight EST to leave your comments.  The winner will be posted on the Sweet 'n Sassy Stamps Blog on Friday, March 20th!

Last but not least...
We can't forget our fun Release Day Challenge!

"Love Your Pet"  
(Include a pet on your card or project) 

Just a few guidelines to remember as you play:
- You don't have to use a Sweet 'n Sassy Stamps image to enter (although we sure love when you do!)
- Please create a NEW card (no back linking)
We ask that you enter your card in no more than 3 challenges
 - You'll have until Thursday, March 19th at midnight EST to enter
- We'll draw 1 winner from this week's challenge to receive a $10 credit to Sweet 'n Sassy Stamps!  
If there are 25 participants, (not including the DT), we'll draw 2 winners!
- Please use code SNSMARCH2015RC when uploading to Splitcoaststampers or other galleries 
To enter simply share a link to your creation below!

Thanks for joining us today!  Be sure to join us again on Friday, March 20th to see if you've won!

 Now it's time to see what the DT has created with these fabulous products! The DT blog links can be found in the Linky Tool below...HAPPY HOPPING & SHOPPING! 

Friday, March 6, 2015

Make ART Challenge - Stencils

It's that time again...time for the Wendy Vecchi Make ART monthly challenge!  This month the challenge was to use stencils.  And boy, oh boy, did I use some stencils in today's project!  Grab your favorite cuppa and get cozy because today's post is a long one!  (Step-by-step!)
My project started with two pieces of gesso'd chipboard, Wendy's new Spotlight Frames and Mask, embossing paste, and brick stencil.  Using the brick stencil, I added embossing paste to my largest piece of chipboard.  On the smaller piece I knew that I wanted to create a cutout in the middle of the board...that's where the mask comes in handy!
 I placed the mask where I wanted it on my chipboard. 
 Then I layered the brick stencil on top of the mask and adding the embossing paste.
Once the mask was removed, I'm left with a perfectly clean opening!  Yeah!  (How do you like the green tint in my embossing paste?  That's what happens when you never clean your stencils...LOL!  No worries, this baby is getting a healthy dose of paint!)
Next came two rounds of paint...Wild Honey and Rusty Hinge Distress Paints.  Dab on and wipe around with a baby wipe...best coverage ever!  (And I like a tiny hint of white showing through...like chipped brick!)
Next...two rounds of Archival Ink..Potting Soil and Watering Can (I'm in love with Watering Can!) These were applied with an ink blending tool.
I used a graphite Stabilo pencil to add some shading to the window frame, Wendy's Mesh background stamp for inside the window, Vines background stamp for...well...vines on the outside of the window and the Tiny Bits stencil for the flowers.

Now here's where things get complicated...I started dinner, emailed Wendy and told her I had a creative block, cleaned the kitchen, got my kiddies in the shower, checked email, ran to the basement a few times to grab more products (yes, I shop from my own store...too frequently...LOL!), and finished my project...all without taking another photo!
Here's the finished piece!  I used Wendy's new Passion for Art stamp set for the face, and License Plate Art for the wish sentiment.  The bird is from the Vintage Floral stencil and the crown and glasses are both Blossom Bucket embellies.  The butterflies are from a Martha Stewart punch and are punched from some scraps I keep on hand for just such occasions.  I also added some stenciling, using the Everyday Words stencil, to the background of my piece.  Oh, and I added a shelf!  You can thank Wendy for that idea...Isn't that fun!  Of course I'm not sure many queens (yes, she's gazing out on her kingdom) store their crowns on a window sill, but perhaps the crow will keep an eye out for thieves and scoundrels who are looking to steal a queen's jewels...

The Make ART Challenge runs until the end of March...and prizes are involved!  Head on over and check out all of the details!  Enjoy!


Wednesday, March 4, 2015

Life Book Week 9

Hi friends!  I'm back with this week's Life Book lesson, which was focused on creating a jar to fill with our favorite things.  Since my mind has lately been on love and being more loving, I opted to make love the theme that my mind focused on during my creative process. It seems that our culture is focused on love being just a feeling when real love is more action than feeling.  Often when we don't feel very loving towards someone our emotions can be helped by doing something loving for that person, even if we don't want to. (Take, for example, responding patiently to our children or spouse when they did the very thing that pushes your buttons.  Not that I'd have any experience responding impatiently...right...)  

Loving actions can actually stir up loving emotions.

I opted to take a portion of 1 Corinthians 13, known as the "love chapter" and focus on the characteristics of what love is and what it isn't.  I started by adding gesso to my watercolor paper and then coloring the paper with a variety of Distress Paints.  I hand drew my jar (with help from a Sweet 'n Sassy stamp set, Get Well Critters..it helps to have a reference!), using a Graphite Stabilo pencil, which smears just enough when water is added.  I then used whatever alphabet stamps I had in my stash to add the words.  The love piece was created by die cutting a shape from the Decorative Plaques set, covering it with vintage paper and more Distress Paint, and then added the grunge board letters. I used a stencil and Wendy Vecchi's Watering Can Archival Ink to add just a hint of flowers.  The birds are from the stencil too...

Last week's jar now has a home on our fridge (hey, adult art can go on the fridge too!) to remind all of us to act loving towards each other and to put away unloving responses and attitudes.