photo kime5_zps3df5231d.png  photo kime6_zpsa90859c6.png  photo kime7_zps9d2ef86d.png  photo kime9_zpsb23b4278.png
Showing posts with label wendy vecchi stencils. Show all posts

Sunday, November 12, 2017

Reverse Stamping Technique with Wendy Vecchi Products

Tap, tap...is this thing on? I know, my crafty friends, it has been ages since I've posted on my blog. Hopefully I still have a few readers, who have stubbornly refused to believe that I was gone for good. LOL! I am still around and occasionally crafting, but with my new full time job it has been challenging to find the time or energy to craft. But this week...this week I have not one, but two projects to share!

The first is a tag featuring new products from Wendy Vecchi. These new goodies were announced in the September time frame and Wendy was kind enough to send me a few products to try. This tag features her new coffee mug mat minis, which are so adorable! This set of mat minis is sure to be one of my favorites. The mug and the pink background feature a transfer technique using Wendy's new Reverse stamp. I love this stamp and can't wait to share even more techniques using this new product. A close up of my tag is below, along with a step-by-step video, and links to where to purchase the products I used on today's tag. I hope you enjoy! Happy crafting!


Supplies:
Wendy Vecchi Translucent Embossing Paste - http://bit.ly/2miCH92 Wendy Vecchi Archival Inks - http://bit.ly/2zQP02b Wendy Vecchi Mat Mini Butterflies - http://bit.ly/2ABqU8O Wendy Vecchi Mat Mini Get Mugged - http://bit.ly/2zQME3E Wendy Vecchi Mat Mini Hearts - http://bit.ly/2hkZnQC Wendy Vecchi Lots of Leaves - http://bit.ly/2mgKRPo Wendy Vecchi Flourishing Art - http://bit.ly/2i6JRIX Wendy Vecchi Checkmate Stencil - http://bit.ly/2jjuv7o Wendy Vecchi Classic Words - http://bit.ly/2yT5as1 Wendy Vecchi Blooming Art - http://bit.ly/2zv52OO Blending Tool - http://bit.ly/2pmq8KG Distress Oxide Inks - http://bit.ly/2ouE7tT Wendy Vecchi Enamel Accents - http://bit.ly/2hsM0Sg

Friday, September 8, 2017

Wendy Vecchi Embossing Powder Technique


Hello, my crafty friends! Welcome to a blog post that is not connected to a design team project! LOL! Oh my, most of my posts over the past few months have been dedicated to only design team projects. It's been a busy time and I haven't had much time to craft. However, when Wendy announced her newest embossing powders, and I got my hot little hands on them, I knew that I had to take some time to create just for fun!

In addition to the fun I had playing with the new embossing powders, I also created a video sharing a fun and easy technique combining embossing powders and stencils. This is a great way to use your stencils in a new way and create beautiful high-gloss backgrounds, embellishments, and mat minis.  

View the video below and check out product links below the video. Enjoy and happy crafting!


Supplies:
Wendy Vecchi embossing powders - http://www.thefunkiejunkie.com/catego... (I used Sunflower, Garden Patina, Potting Soil, Cactus Flower, and Forget Me Not) -Wendy Vecchi Enamel Accents - http://www.thefunkiejunkie.com/Wendy_... -Mini Ink Storage - http://www.thefunkiejunkie.com/Ranger... -Wendy Vecchi Mat Minis - http://www.thefunkiejunkie.com/catego... (I used the Hearts, Homestead, and Butterflies) -Stamps (all from Wendy Vecchi) -All Cracked Up - http://www.thefunkiejunkie.com/Wendy_... -Birds for Art - http://www.thefunkiejunkie.com/Wendy_... -Simply Stripes - http://www.thefunkiejunkie.com/Wendy_... -Garden Art - http://www.thefunkiejunkie.com/Stampe... -Mixed Media Cardstock - http://www.thefunkiejunkie.com/RANGER...

Monday, February 8, 2016

Wendy Vecchi Mini Album

Hello there, crafty friends and welcome to Monday! I'm super excited to share a new project with you today, which features many of Wendy Vecchi's newest products! WooHoo! (The crafty fairy sent me a box of goodies to play with...she's the BEST!) You can find links to all of the products used in my project listed at the end of the post.

The first new product? Wendy's new Mini Mat Fat Little Book! This darling little book features four mini pages (4.5" x 4.5") made of mat board, which is a very heavy duty material that can stand up to whatever you throw at it (no, you can't cut it!), paint, glue, ink, you name it.

I painted the front and back covers of my book with black gesso and then used the Checkmate stencil and a baby wipe to remove some of the paint. Once that layer was dry I mixed Wendy's embossing paste with Dina Wakley's Gilt paint to create gold paint. (And, yes, using Wendy's gold embossing paste would work just as well!) The paste was applied using the Classic Words stencil. When the paste was dry I got to work on my decorations. The front cover features the new Stamp It, Stencil It set Mirror Flowers. I stamped the larger flower three times to create lots of dimension. (There's also a bit of stamping seen on the text oval, behind the flower) The sentiment is from the new Birds for Art set and the tiny hearts is from the Just Say It background stamp (yes, I cut apart all of those fabulous sayings!). 

I opted to use my album as a photo album showing off my three favorite guys. Because the majority of our photos are now in digital format, it's nice to actually print some out and put them in an album that you can look at regularly.

Since I had a lot going on in the background of each page, I opted to keep the photos black and white. Love that contrast! These first two pages feature a leaf stamp from the new Blooming Art stamp set, and seriously, this leaf stamp is going to show up on everything I make...love this image! The bird and birdhouses...are they not to die for...are Wendy's new Mat Minis, which perfectly coordinate with the Stamp It, Stencil It Put a Bird on It set. Stamping the details on to the chipboard is so much fun! This has to be my favorite product from this latest release. The sentiment on the left is from an older set and the one on the right is from the Blooming Art set.
Next up we have more mat minis! The hearts, which were colored with Distress Ink, covered with polka dots, thanks to the new Lots of Dots stencil, and coated with Glossy Accents look so cute popping out of that tiny envelope, from the Birds for Art set. The buttons on the right are also new Mat Minis. I simply colored them with Distress Inks and used some random stamps to add decoration. The sentiment, that I slighted altered, is from the Just Say It background stamp.

The next two pages are all about stenciling. I used the the Fence & Foliage stencil along with the older Layered Tree stencil. The stars are even from a stencil! I just inked the stars, from the Little Bits stencil, with Distress Ink on a piece of cardstock and then cut them out. The bird is from the License Plate Art stamp set and the sentiment is from an older set. 
And here is the back cover, which I think might be my favorite page! I die cut a circle (from a book on the cold war...can you tell by the text?), and layered on a love card (from Tim Holtz), some film tape, an Art Parts star (covered with Distress Ink, a plaid stamp, and teal splots...love the teal!), sentiment, and another tiny flower from the Mirror Flowers set. (I loved those teal splots so much that I went back and added them to every page in my album!)

Want to get your hands on the new Wendy Vecchi goodies? The Funkie Junkie has everything you need! Products should be shipping soon and get your order in now! Follow the links below! Enjoy and happy crafting!

Supplies:


Monday, February 1, 2016

Thoughts of You

Sometimes you need a card and you need it quickly! One layer cards to the rescue! Today's card was created in a matter of minutes using just a piece of watercolor paper, inks, and stamps.

First, I used a blending tool and Distress Ink (Scattered Straw) to cover the entire piece of Ranger watercolor cardstock. Next, I added more layers of ink...Rusty Hinge, Fired Brick, Ripe Persimmon, and Gathered Twigs. To keep the ink blending smoothly from color to color, simply rub back over the entire piece with your lightest color, in this case Scattered Straw.

To get those fun splotty spots, mist water on top of the dried Distress Ink...it reacts with water! Dry and you're left with great texture. Since I can't be happy with a completely plain background, I added some stenciling using two of Wendy Vecchi's stencils, Classic Words and Lots of Dots. (See links at the end of the post)

The last step was to add stamping! To create more depth on the card, I stamped my images using white gesso, Hickory Smoke Distress Ink, and Jet Black Archival Ink. All of my beautiful silhouette stamps are from Sweet 'n Sassy. (Links to specific stamp sets below)

Add a sentiment and attach to a pre-cut 4.25 x 5.5 card base and my card is ready for mailing!

Hope you enjoyed today's quick and easy card...be sure to check out the product links below to grab your fav products from this project.

Happy crafting!

Supplies:

Friday, January 22, 2016

Make Art

Greetings friends! Today I'm sharing a Wendy Vecchi inspired card, featuring oddles of Wendy's stamps, stencils, and inks. No step-by-step today...this was a card I create just for fun to celebrate the release of lots of new Wendy Vecchi products! (You can visit The Funkie Junkie Boutique to pre-order all of the CHA goodies!)

I started this card by creating a background using Wendy's Archival Re-Inkers and Specialty Stamping Paper. See this post on Wendy's blog to see her technique for creating these fun and super easy backgrounds.

Next I created lots of layers by utilizing my stash of stencils. (Full supply list at the end of this post). I use the same ink colors with my stencils that I used in the background. This keeps the background from competing with my main images. My last stencil choice always gets matched with Jet Black Archival Ink for that little bit of pop. (Every creation needs black ink!)

I created the oval window on my card by tracing around a mask from one of Wendy's stencil/mask sets. I use this set constantly!

I confess that the images I used for this card are from an older Wendy set, I'll try to find a link for you. All of my images were stamped in archival ink and then colored with Tim Holtz Distress Markers. The flower image was watercolored with Peerless watercolors. Once all of my pieces were completed, I fussy cut them and added some Glossy Accents to every piece. You can just see the shine in the photo above.

The "shelf" was created by using an Arts Parts piece that was covered with vintage text paper. I stamped over the paper and added some twine and a random metal piece.

Before I assembled my card, I added some stamped leafs in the background, just to add more fullness to the entire layout.

Once my individual pieces were completed, I attached everything with a combination of liquid glue and foam tape. This combo creates great dimension on any craft project. The sentiment was stamped on cardstock and then each word was cut out and attached to the card. Cutting the words apart allows me to put a sentiment in any type of layout I want vs. being tied to the exact layout of the stamp. Some faux stitching, from one of my very favorite Wendy stamps ever, was my finishing touch.

I hope you enjoyed today's card! I'll be back in a few days with this week's Inspiration Wednesday project! Can't wait to share...it's dreamy... Check out the links below to purchase products used on my card.

Supplies:
-Wendy Vecchi Archival Inks (Jet Black, Cornflower Blue, Watering Can)
-Wendy Vecchi Stencils - Polka Dotty, Artful Words, Add a Stencil, Four Spotlight Frames & Masks)
-Wendy Vecchi Stamps - (You can find all of the newest Wendy stamps here) - A list of the sets I used to follow - It's Face Art, Just So Artsy, License Plate Art, Art School, My Kind of Art

Monday, July 6, 2015

A Dream to Pursue

It's the beginning of another month (and, please summer slow down!) so that means it's time for another Wendy Vecchi Make ART Challenge! This month is was all about polka dots. I created this tag to celebrate all things Wendy and all things dotted!

I created this tag by first spritzing the tag with a combination of Art Anthology Coloration Sprays. I adore Art Anthology's ink sprays..the colors beautiful, right up my color alley (brights on not my thing), and they react just like the Distress product line. This means I was able to get some great ghosting effects, using a few of Wendy's stencils....see that wee little checkered pattern?

Once my tag background was finished I added more stenciling, using a combination of Distress and Archival Inks.  

The blue oval was created by first spritzing with more Art Anthology spays and then stamping with Wendy's Ornate Dots background stamp. I then used the Ornate Dots Overlay stencil to cover the stamped area, exposing only the blue dots. A little application of embossing ink and clear embossing powder and I had pretty little glossy polka dots! The overlay stencil acts like a mask!
The oval was cut out following the oval pattern from the Masks and Frames set, and then I used my black Fude Ball marker to trace around the oval and add a few decorate dots.

The flowers were stamped on a separate piece of cardstock, colored with watercolors, and fussy cut. One flower was glued directly on to the oval and the other was popped up with foam tape. Then I just added my sentiment and butterfly (and who can guess which stamp the butterfly pattern came from? And it has to be someone besides Wendy guessing...) :-)

I hope you enjoyed today's tag and be sure to head on over the Wendy's challenge blog to check out all of the details on this month's challenge...prizes are involved!! Woot! Woot!

Wednesday, June 24, 2015

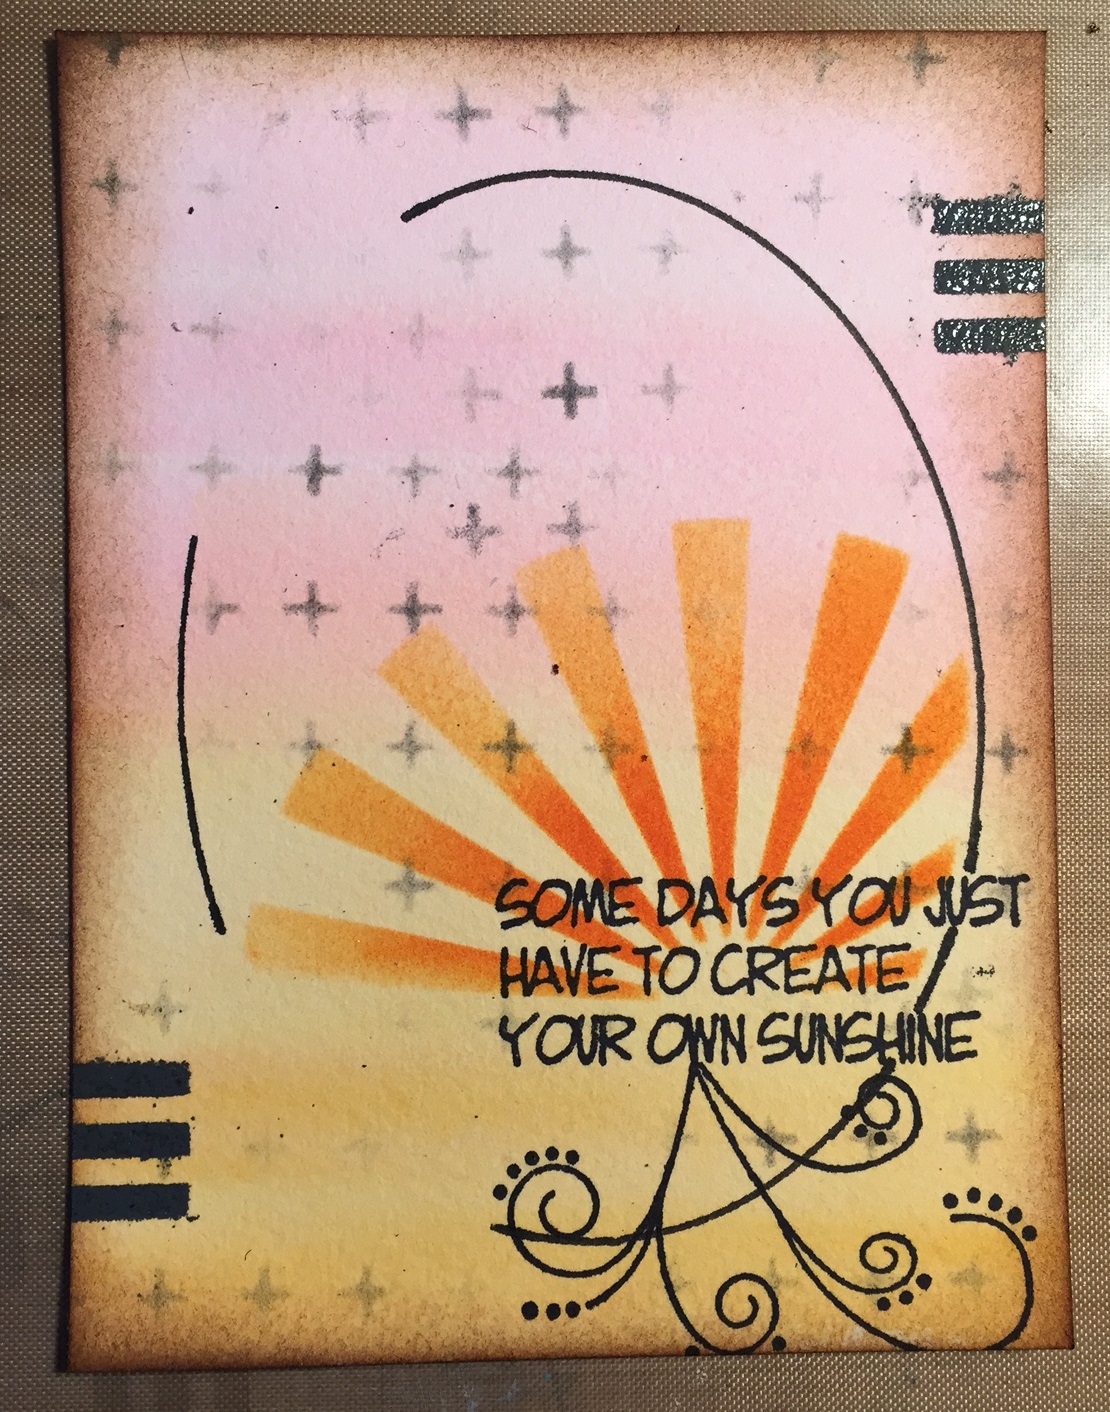
Create Your Own Sunshine

Howdy friends! I'm sharing, at the very last minute (the deadline is tomorrow at midnight!), my project for the Wendy Vecchi Make ART Challenge, which was to use embossing powders on a project. Here's my finished card and this is how I created it...

I started with a piece of Mixed Media cardstock, perfect for any kind of ink, spray, or paint. I used Distress Markers, a water brush and my non-stick craft sheet to add color to the background (and it appears that I'm still a bit obsessed with pink and grey).
I scribbled ink from the marker on the non-stick craft sheet and then picked up the ink with the water brush. Then I just swiped the brush over the cardstock.

Next I used some of Wendy's stencils to add some background design, using Watering Can Archival Ink (my favorite color ever!)
I also used the oval shape from the Spotlight Frames and Mask set to create a mask on my background, which I then traced with a black Fude Ball pen. I then used the oval shape frame to act as a mask for my background so that I could stencil the Sunburst shape and keep the burst within the border on my frame. I then stamped the sentiment and swirl from the Paper Doll Art stamp set.

My card features spot embossing, meaning that instead of embossing a large area I'm only embossing a portion of a larger piece. You can see my Watering Can embossed lines at the top and bottom of my card.
Next, I used the new Tiny Shapes Movers & Shakers dies (aren't they the tiniest, cutest dies ever!) to die cut a few embossed butterflies. For quick and easy die cut embossing, I first added some Distress Ink to a scrap piece of manila tag and then used clear embossing powder. Then I just die cut the shapes out of the already embossed tag!
Next, it was time to assemble! And here is my completed card...
You can see that I embossed the butterflies, my gal's apron, gloves, and lips. This was done by first stamping or coloring the image and then using a VersaMark pen to color over the area that was embossed, I used clear powder for these areas so that the colors would show through the powder.

You have a bit more than 24 hours to enter the challenge, and this month I'm giving away some free Wendy Vecchi goodies to a random entrant! Head on over to the Make ART blog and join in on the fun!

Monday, April 20, 2015

Make ART Journal Layout

I have a photo tutorial posted over on the eclectic Paperie blog today...hop on over and check out all of the details!

Thursday, January 8, 2015

Make ART Challenge #1 - Embossing Paste

Yippee!!!  Today is the official launch of the new Wendy Vecchi Make ART Challenge blog!  I am so excited to be helping Wendy out with the blog and even more excited to be highlighting her amazing artistic talents!!  Today's challenge is all about exploring the joys of embossing paste (I LOVE it!) and you can read all of the details about the challenge here.  I also have a quick photo tutorial for you today, showing you how I created my card.

  Use a blending tool to apply Scattered Straw and Tumbled Glass Distress Ink to a piece of cardstock (pre-cut to standard card size).
Use Wendy's Dots and Dashes background stamp to lightly stamp on the background in Jet Black Archival Ink.  Set aside.
Stamp the vintage lace image from the Say It With Art stamp twice on a piece of book text (use Archival Ink).
Make hills out of the lac image!  WooHoo!!  (I also added a bit of script text to my card background, using Pumice Stone Distress Ink).  After I added the hills, I used a blending tool and the Sunburst stencil to add the sunbeams, and of course added Gathered Twigs to all edges.  Here comes the fun part!
  I used the Potting Soil and Fern Green Archival Ink Pads and smooshed them on my non-stick craft sheet.  Then I added a blob (don't you love my technical terms?) of white embossing paste to the ink.  (You can also do this same technique using re-inkers)  Mix the embossing paste with the ink...Voila...instant custom embossing paste colors!  Now I can stencil...
Using the Layered Tree stencil and my custom colored embossing paste allowed me to add a beautiful tree to the front of my card.  Wouldn't the tree be pretty in fall colors too?!  Be sure to store your extra paste in some of Wendy's Mix 'n Store jars.  Now I just need to add the finishing touches...
  I added a sentiment from the Forever Art stamp set, a bird from the License Plate Art stamp set, and a heart (embossed with Wendy's Red Geranium embossing powder) from the Little Bits stencil.  Once finished, attach the piece to a black card base. 
I hope you enjoyed today's tutorial and please be sure to check out the challenge on the NEW blog...Wendy is showing off many new products and there's a prize up for grabs!!
 

Tuesday, August 12, 2014

Believe

Hi all!  I had an opportunity to do some crafting this weekend (woohoo!!) and I created this card using a whole bunch of Wendy Vecchi products (links below).  I also created a video to show you how you can recreate this same look on your own.  The video also includes instruction on how to color Wendy's embossing paste once it's dry.  Fun stuff!  Enjoy!!


Supplies:


Tuesday, August 5, 2014

With Sincere Thanks

Hi kids!  I'm back with a new card to share...I know, it's been ages!  Our family has been fully embracing the summer months and have been on the go each and every day.  I finally had some time to play with...drum roll please...the brand new Wendy Vecchi products!  Woot!  Woot!  Wendy's new stamps, stencils, and SiSis (Stamp It, Stencil It) products arrived last week and of course I had to grab a few of the new sets (or all of them!)  And for one day only, eclectic Paperie is offering a 20% FLASH Sale on Wendy's new goodies!  Just use code WENDY2014 when you check out...sale ends on August 5 at midnight (EST!)

So how about today's card?  It features all kinds of wonderful products...can't wait to share!  (And I'm sorry for not taking step-by-step photos...was working on a new video, see link below, and didn't have a ton of time left to create but the steps are listed below).

  1. Use a palette knife to apply a generous layer of embossing paste (white) to all four sides of cardstock (I'm using Strathmore Mixed Media cardstock).
  2. Use the new Lots of Leaves background stamp to press into the wet paste (be sure to clean your stamp immediately to remove all of the paste).  You can see the tiny leaf prints in the paste.
  3. Dry with heat tool or allow to air dry.
  4. Spritz background with Dylusions Ink Sprays.  I used Lemon Zest and Tangerine Dream.  Dry with heat tool.
  5. Use Add a Stencil and Pumice Stone Distress Ink to add a layer of design to the card background.
  6. Use a blending tool and Gathered Twigs Distress Ink to ink the edges of the card.  This is a great way to make the leaf pattern pop out a bit more.
  7. Die cut oval and use Jet Black Archival Ink to stamp flower design, from the Pretty Little Posies SiSi, onto the oval.  Heat set ink.
  8. Lay coordinating stencil, from the Pretty Little Posies SiSi set, over the top of the stamp flower and color with Red Geranium Archival Ink.  (The mini blending tool is great for this application!)
  9. Add bronze pearls to the flower centers and tiny white dots to the petals, using a white gel pen.  Add faux stitching around the oval.  Add small bow to the bottom of the oval.
  10. Use swirl from the Say it With Art stamp set to stamp a butterfly trail.
  11. Use foam tape to attach oval to left side of card and glue dots to attach the butterfly.  (The larger butterfly is from the Little Bits stencil, I just traced it on a piece of designer paper).
  12. Stamp sentiment from the Say it With Art stamp set, using Jet Black Archival Ink.
  13. Mount entire piece on black cardstock.
 Hope you enjoyed today's card...why not head on over to the eP store and grab yourself some new (or older) Wendy Vecchi products...you won't be disappointed.

Happy Crafting!!

PS - I've had some questions about how the new Ranger Texture Paste compares to Wendy's Embossing Paste so I put together a video...check it out below:

Wednesday, June 25, 2014

Be Fearless

Today I'm sharing a project that I created during a class with Dina Wakley, which I attended last year.  The focus of the class was on understanding color, an area where I struggle with when it comes to art journaling, which makes me giggle since I have no issues with this when it comes to card making.  I think much of has to do with me being so darn excited about creating journal pages that I grab way too much stuff and struggle with knowing when to stop applying color, design, and layers!  WooHoo!

During the class, Dina talked about the color wheel and using colors that complimented each others and those that were on opposite sides of the color wheel (if you don't have a color wheel, get one, it's really a helpful tool!)  We created a bunch of color combinations in the beginning of the class before we started working on the journal pages.  We created two pages and this one has become one of my favorites...I love the background color and contrast of the deep blue.  Hey, I did it...two color families and a neutral!  Yippee!

 
We started by using deli paper (get some of this stuff, it's awesome!), paint, and stencils to create a sheet of patterned paper.  Once that was dry, we cut out random shapes; since I'm a fan of circles, that's what I went with.  Then we created the background of the journal page, using a contrasting color.  (Orange and blue are on opposite sides of the color wheel).  I used only colors next to each other on the color wheel to create the background colors (yellow, red, orange).  Once the color was dry on the page, then I added the deep blue/purple circles (again, colors that are next to each other on the color wheel).  Then it was time to add additional designs and neutral colors.  Black is my favorite neutral as it really pops on a page.  I used paint in a bottle with a pointed tip to draw the fern image and write the words "be fearless" and a watercolor pencil to draw around the circles.  I then cut out text paper to fill in the leaves.  Lastly, I just added some stenciling.  Again, using black and my background orange color.  (Oh, and I added some tiny white dots 'cause I like dots!)

This was a really fun project...learning to play with color is great stuff!  Grab a color wheel, art journal, stencils, and some paint and experiment...be fearless!  (Product supply below)

Supplies:
Dylusions Art Journal
Acrylic Paint
Classic Words Stencil (from Wendy Vecchi)
Various Crafters Workshop Stencils

Wednesday, December 11, 2013

Mixed Media Book with Catherine Scanlon Stamps

Welcome to day three of eclectic Paperie's 12 Days of Christmas Celebration!  WooHoo!  It has been an exciting few days and I have been amazed by the beautiful projects posted by our design team...they are the BEST!  And I'm thrilled to be sharing a handmade book project with you today, featuring today's product...Catherine Scanlon stamps!  Catherine is an amazing artist and I was so excited when she launched her stamp and stencil line.  And today only, you can save 30% on one of Catherine's stamps, when you buy one at full price!  Wow, great deal!

I created a video for today's project, which will walk you through the steps needed to re-create a similar book.  And you'll find links for all of the products that I used at the end of the post.  I'm not going to post all of the photos here in the post as you'll see the completed project in the video.  Enjoy!

My cover featured this beautiful Black Eyed Susan image, drawn by Catherine.  The sentiment is also from her new line.  I used Art Anthology sprays to color the paper and a variety of stencils for decoration.  Again, all product links at the end of the post.
The inside cover featured an embossed piece of scrap paper that I had created for another project.  The coloring was perfect for this product and I loved that there was also a gesso resist technique used on the scrap.  Check out my gesso resist video for more details on that technique.  I had the home card in my stash and added the rest of the sentiment using some tiny letter stamps.  One of Catherine Twinchies stamps is above the card.
I'm not the best at journaling, although I should try to do more as it's a great way to record your thoughts, but I love using quote stamps and this big long one from Tim was perfect to fill the page.  I really like stamping directly onto a photo as well.
Seriously, aren't these the moments that make the hard task of parenting all worth it.  Just look at my crazy boys, wearing cardstock masks...and the look my youngest is giving my oldest is priceless.  I adore this photo!  The "so love these moments" stamp is from Ali Edwards.
Another favorite photo...and a great sentiment, stamped in black, and more words above, which have been stenciled.  And a big number eight to signify his age when this photo was taken.  Sigh...that both of my kids would be fearless...not in a reckless way but in a way that keeps them doing what is right and pursuing their dreams.
Inside back cover, with another piece of scrap paper, a card, sentiment, and part of a Twinchies image.  And see my mess up date stamp?  I even like that!!  Embrace the imperfection!!

Check out the full video below, along with all of the product links!  Enjoy!


Supply List:
Catherine Scanlon Stamps (Black Eyed Susan, Twinchies, Good Advice)
Wendy Vecchi Stencils (Three Flourishes and Bar Codes)
Dylusions Stencil (Leaf Flourish)
The Crafters Workshop Stencils (Tiny Circles, US Map, and Cursive Alpha)
Art Anthology Sprays (Timeless and Peacock Feathers)
Claudine Hellmuth Gesso
Copic Markers
Distress Inks (Mustard Seed, Pumice Stone, Gathered Twigs, Pine Needles)
Strathmore Mixed Media Paper


PS - Just realized I have a typo in my video...saying today is the 12th instead of the 11th!  Oopppss...it's late! LOL!