photo kime5_zps3df5231d.png  photo kime6_zpsa90859c6.png  photo kime7_zps9d2ef86d.png  photo kime9_zpsb23b4278.png
Showing posts with label embossing powders. Show all posts

Saturday, November 3, 2018

Concord & 9th Turn About Stamp Class - Butterfly Reflections

I'm excited to announce that I'm teaching another card class at Butterfly Reflections in Kingston, NH. All of the details are below...hope you can join us!

Date: Thursday, November 15
Time: 7-9 pm
Register by: Tuesday, November 13

Join me for an instructive class focused on the Concord & 9th’s Turnabout Stamp line. These versatile background stamps allow you to make beautiful multi-colored backgrounds with the use of only one stamp! During the class, I will demonstrate how to use these unique stamps and then walk you through the creation of four card backgrounds using a variety of products and techniques. If you own Turnabout Stamps, bring them along and learn how to use them in a new, fun, and interesting ways.

Supplies Needed for Class:
  • Stamp positioner - must be full size Misti or mini Tim Holtz stamping platform
  • Adhesive - glue, tape gun, and/or foam tape
  • Heat gun (very important)
  • Basic Toolkit - Non-stick craft sheet, scissors, baby wipes, paper cutter, bone folder
  • Turnabout Stamps - If you have them....the more, the merrier!

Wednesday, November 29, 2017

Ranger LETTERit Release - Six Technique Cards


Hello friends and welcome to today's exciting announcement! Ranger Ink has just announced a new series of products, LETTERit, that is geared towards card makers. Woot! Woot! We have always known Ranger for their wonderful Distress Products and other crafting mediums, and now we can look to them for the production of beautiful sentiment stamps, various kits, including embossing and Perfect Pearl kits, metallic pens, and more! Read more on Ranger's web site.

I've created a video that walks you through each of the new products and showcases six unique cards, demonstrating a variety of techniques. Each of the cards focuses almost entirely on using only the new LETTERit products. You'll be amazed at the creative options available by using the kit supplies.

Scroll through the photos below to see a close up of the cards that I created and then enjoy the short video that follows to see how each of the projects came together. A supply list can also be found at after the video. Interested in purchasing LETTERit products? Visit your favorite craft supplier retail store! Enjoy and happy crafting!

The card above sums up my feelings on being selected to participate in the new product release...GRATEFUL!! A big thank you to Ranger for allowing me to play with the new goodies!


Supplies:

Friday, September 16, 2016

Holiday Hugs - New Stamps from Sweet 'n Sassy

Hi there crafty friends! Today's card features a darling new stamp set from Sweet 'n Sassy, Holiday Hugs. This adorable set features this little penguin and a snowman main image, along with some snowflake images and a bunch of holiday inspired sentiments. You can see the entire set below:
Here's how I created my card (it's a wobbler card!)...
  • Use VersaMark and white embossing powder to stamp and emboss the snowflake images on to a piece of white cardstock.
  • Use a non-stick craft sheet and painters tape to hold you embossed piece of cardstock stable.
  • Grab some Distress Inks and smoosh some ink on to the craft sheet.
  • Use a paint brush to apply clean water to the entire background, then pick up some of the Distress Ink and apply to the wet cardstock. Because the paper is very wet, the color will easily run and blend.
  • Once you're happy with the results, dry completely with a heat tool.
  • Stamp the penguin image on a piece of scrap cardstock and color with more Distress Ink, fussy cut.
  • Die cut two hills using the Hillside Edges die set, color the trees with Distress Ink (use a blending tool), add highlights with a white gel pen.
  • Attach the hills, overlapping them, using foam tape. I glued the first hill directly to the background and then used foam tape on the second hill.
  • Add sentiment to hill and on sled.
  • I added a wobbler to the back of the penguin so that he moves! It's so cute!! I just cut a piece of heavy cardstock into a spiral shape and attached one end to the penguin, using foam tape, and the other end to the card. Here's what it looks like from behind...
I also added a bunch of glitter to the hills, using a Wink of Stella glitter pen, and shine to the penguins feet and beak, using glossy accents. 
I also stamped a sentiment and the tree from the snowman image inside my card.
Be sure to check out all of the fun Sweet 'n Sassy holiday stamp sets...all are shipping now!

Happy Crafting!

====================================================================
Visit my web site, or email me, to learn more about Nerium and their products. I've been a long standing Nerium customer, the night cream produces amazing results, and am so excited to now be running my own store!

If you're local in NH, contact me for a free, 7-day trial!


Wednesday, June 24, 2015

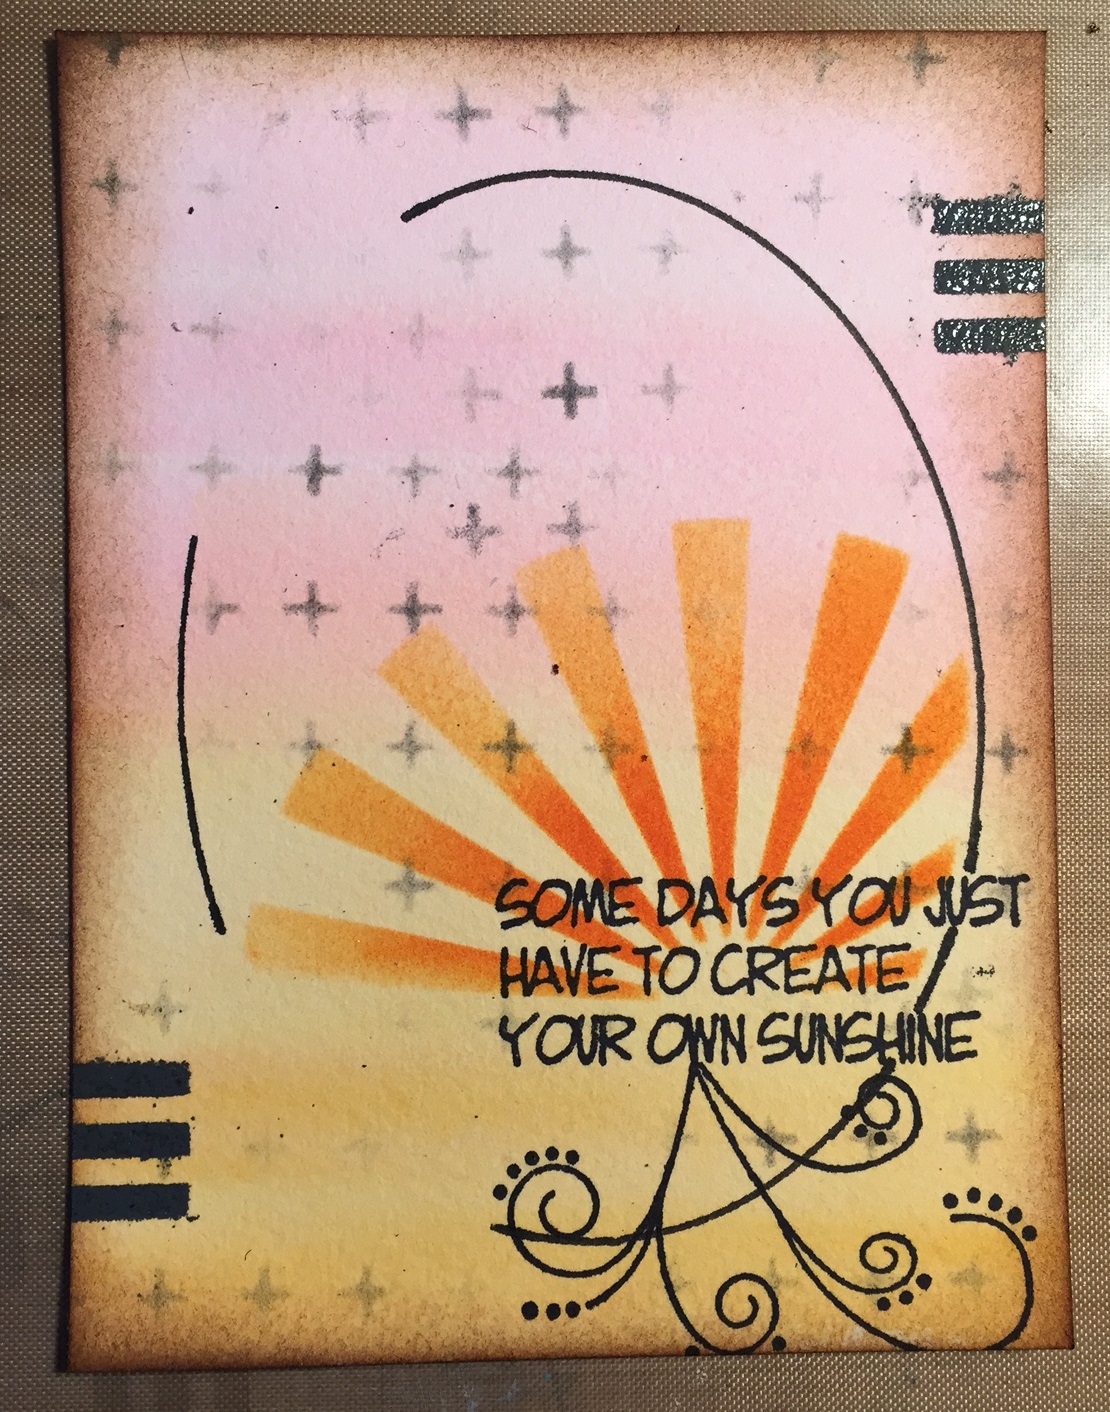
Create Your Own Sunshine

Howdy friends! I'm sharing, at the very last minute (the deadline is tomorrow at midnight!), my project for the Wendy Vecchi Make ART Challenge, which was to use embossing powders on a project. Here's my finished card and this is how I created it...

I started with a piece of Mixed Media cardstock, perfect for any kind of ink, spray, or paint. I used Distress Markers, a water brush and my non-stick craft sheet to add color to the background (and it appears that I'm still a bit obsessed with pink and grey).
I scribbled ink from the marker on the non-stick craft sheet and then picked up the ink with the water brush. Then I just swiped the brush over the cardstock.

Next I used some of Wendy's stencils to add some background design, using Watering Can Archival Ink (my favorite color ever!)
I also used the oval shape from the Spotlight Frames and Mask set to create a mask on my background, which I then traced with a black Fude Ball pen. I then used the oval shape frame to act as a mask for my background so that I could stencil the Sunburst shape and keep the burst within the border on my frame. I then stamped the sentiment and swirl from the Paper Doll Art stamp set.

My card features spot embossing, meaning that instead of embossing a large area I'm only embossing a portion of a larger piece. You can see my Watering Can embossed lines at the top and bottom of my card.
Next, I used the new Tiny Shapes Movers & Shakers dies (aren't they the tiniest, cutest dies ever!) to die cut a few embossed butterflies. For quick and easy die cut embossing, I first added some Distress Ink to a scrap piece of manila tag and then used clear embossing powder. Then I just die cut the shapes out of the already embossed tag!
Next, it was time to assemble! And here is my completed card...
You can see that I embossed the butterflies, my gal's apron, gloves, and lips. This was done by first stamping or coloring the image and then using a VersaMark pen to color over the area that was embossed, I used clear powder for these areas so that the colors would show through the powder.

You have a bit more than 24 hours to enter the challenge, and this month I'm giving away some free Wendy Vecchi goodies to a random entrant! Head on over to the Make ART blog and join in on the fun!

Tuesday, December 30, 2014

Altered Wooden Box

Tap, tap...is this thing on?  Goodness, I've taken a longer than anticipated blog break over this holiday season.  It's been so much fun taking the time to really enjoy the holidays with the kids and to not be too stressed about much of anything.  Oh, and eating far too much chocolate!

Before Christmas was upon us, I had an opportunity to create a sweet shadow box, featuring photos of my sweet munchkins.  The box actually held some embellishments (see photo below) before it became a craft project.
The box held these cute resin embellishments and once I removed the gears (this just happens to be the embellishments that I have) I covered the box with tissue tape.
I then added a layer of Art Anthology dimensional paint.  I love their paints because they leave a great shine, with just a hint of glitter, when they're dry.  Oh, and they're transparent so you can still see the tissue tape through the paint.
  I added Potting Soil Archival Ink around the edges for some good aging.  (I used Archival Ink because it was going over paint and Distress Ink could wipe off)
Once my paint was dry, I added decorative paper and photos.  On this panel, I added a hand cut hill, with Liquid Pearls snow, and two wooden trees that were altered with Distress Embossing Powder.  The little star is a sticker and I just added shine with a glitter pen.

   I used Ali Edwards stamps to add sentiments to my photos.  A few wooden snowflakes were embossed with Wendy Vecchi's Cornflower Blue embossing powder and I added the number 25 to this snowflake in the corner.
One snowflake was layered on top of a metal ring and the last photo received two chipboard pieces and a tiny bottle filled with red and green sequins.
Here's a photo of the entire piece...it's small, each photo box is only 3"x3", but perfect for placing on our half wall inside our doorway or on a wall.  I think this might be a project that I store during the year and pull out on Christmas.  It's sure to make me teary as I look back on how quickly our boys have grown...
 Wishing you all a Happy New Year!  Stay tuned for more projects...coming up next week!


Friday, February 1, 2013

Let Your Dreams Take Flight


Hey...have you heard?  Splitcoast has started a brand new mixed media weekly challenge!  Isn't that fabulous!!  I'm so excited that SCS has decided to venture into this wonderful new art...once you get started, you won't be able to stop!

And I'm even more excited that I had time today to make a card for the first challenge! Woot! Woot! The challenge this week was to combine paint and something shiney, such as embossing powder, metal, etc.  I decided to stick with acrylic paint and embossing powder.
 
I started by painting a piece of sticky back canvas with Adirondack acrylic paints.  I used what has become my fav color combo, Salmon and Terre Cotta.  I then added just a hint of Eggplant to the edges when I had finished.  (Know what is a great blending tool...besides your finger...a baby wipe!  Perfect for working in the darker color paint with the background colors!)
 
I then added a few bits of script from a much loved Tim stamp (from way back when!) and then I stamped my Hollyhock image with VersaMark ink and embossed with black embossing powder.  (That's my shiney element for the challenge!)
 
I stayed true to my love of all things CAS with my card, which can be a challenge with mixed media projects, but I'm learning and having fun experimenting. The background of my card base is embossed with an embossing folder and then I layered the canvas on another piece of white cardstock and popped up the entire main image with foam tape
 
I had a great time playing along with the challenge...why don't you give it a try?!  Enjoy!