photo kime5_zps3df5231d.png  photo kime6_zpsa90859c6.png  photo kime7_zps9d2ef86d.png  photo kime9_zpsb23b4278.png

Wednesday, January 30, 2013

Paradise

Paradise...I could use a little time on the beach this week!  It's been freezing here in New England, with temps down close to zero for days and days.  Brrrr...I'm ready for warmer weather!  And sunshine!  Is hibernation an ok thing for humans?  I'd like to get in on that deal...

Well I'll have to settle for cards featuring beach scenes for now.  Cards!  I've missed spending some time making cards and last night I finally had some free time to just create...just for fun.  Sweet 'n Sassy is featuring today's sketch challenge on Splitcoast and I just loved the sketch...Hello?  Banners?  Why yes, I'd love to play along!  I'm in love with banners lately!

I grabbed some summery feeling paper from My Minds Eye and my Ocean Paradise stamp from Sweet 'n Sassy and got crafty!  I started by cutting all of my cardstock.  This is what I love about sketches; I can cut all of the cardstock and have it ready to assemble when I'm finished with the main image panel...perfect!  I then stamped my beach scene, using black Memento Ink, and then grabbed my Distress Markers...'cause summer just seems to go with watercoloring, right?

To color the image, I first scribbled with my markers onto a non-stick craft sheet and then used a watercolor brush to pick up the color and apply it to the image.  This is my preferred watercolor method when using the markers as I feel like they don't bleed enough when you apply the color first to the paper and then try to blend with the brush.

Then I assembled and added a few tiny gold pearls...Easy peasy and oh so beachy!

Enjoy and why not try out today's sketch challenge...

Friday, January 25, 2013

Snapshots Mini Album


Hi friends and welcome to my sorely neglected blog...Seriously, I need more crafty time in my life!  Well...this past weekend, I took advantage of some extra free time that I did have and decided to put together a darling mini album kit, the Snapshot eKit, which was created by Mary-Ann Maldonado, and offered by eclectic Paperie.

Oh, I created a little video on the process of putting together this album.  It's a great way to see all of the goodies included in the kit!
I am a huge fan of mini albums, especially onces that I don't have to create from scratch!  I love kits because you get everything needed to create the mini album and you get full directions.  Only assembling is required...Oh yeah, talk about finishing a complete album in just about two hours!  Love that!
This kit contains an album, in the Smash book style, from Amy Tangerine.  And this is the cutest album I have ever seen!  Seriously, so cute...The album is filled with pages of every size and style.  Vellum type pages, tickets, scallop pages...I was giddy once I opened the album and checked out all the goodness inside.
 And all of the contents, stickers, die cuts, and paper are from American Crafts.  Amercian Crafts produces darling, high quality products and I loved every little bit of the goodies found in the kit.  You know what I loved the most?  The washi tape!  Washi tape holding photos and little pieces of decorative paper...how fun it that!  (Forgive that crazy glare on my photo!)
 Mary-Ann even includes items like toothpicks in her kits...So you can make your own banners, of course!  All you need to finish the albums is a paper cutter, adhesive, and foam tape!  Easy peasy! 

And for this album, I found photos from 2008 that have just been collecting dust in my studio.  These photos are from a trip our family took to NY....my kiddies were so little and it was so much fun to go through this photos again and finally get them into an album!
Seriously, look at those smoochie faces!  Ugh...they grow up too fast!!  This album even has an envelope stitiched into the center...perfect for keeping track of little mementos.  And I love the map paper...isn't that great for vacation photos?
Looking for a way to create a quick and easy mini album?  Check out all of our eKits, dust off those photos, and get them into an album!  And save 10% on all our eKits, from now until 1/29, just use code KIT10 when checking out!
 
Enjoy!

Tuesday, January 22, 2013

Happy Winter


Last week Korin was on a clean and simple design kick and was posting the most precious cards to her Facebook page....that inspired me to pull out my well loved Sweet 'n Sassy stamps and create my own CAS card!
 
And since a big snowstorm was predicted for last night (we got nothin'!), I was thinking of the cold and winter so I grabbed one of my fav sets, Snowflake Silhouettes.
 
To create my card I simply layered some coordinating blue cardstock with my stamped snowflakes.  I used three blue Distress Inks, Weathered Wood, Chipped Shappire, and Broken China, to stamp the snowflakes and then added a sentiment (also found in the stamp set!) 
 
Now someone get me either a decent snowstorm or warmer weather!!
 
Enjoy!

Thursday, January 17, 2013

eTeam Picks Challenge - Altered Box

Hi everyone and welcome to eclectic Paperie's first eTeam Picks challenge!  The eTeam Picks challenge is all about having fun!  On the third Thursday of every month one of the eTeam members will throw out a challenge.  Those who want to participate in the challenge can enter their project and be entered into a drawing for a $15.00 shopping gift certiciate to eP!  Visit the eP Blog for all of the details!

This month's challenge was to alter a box...any kind of box...wait until you see what Marjie came up with...fun stuff!  I decided to alter a 3x3 mini box and followed Donna-Marie's tutorial to create my project. 
I started by painting the edges of the box with Pitch Black acrylic paint.  I then used paper from the Authentique Renew line to cover all the sides of the box (love the new 8x8 paper pad size!).  This box comes with a lid but I followed Donna-Marie's directions for keeping the lid upright. 
 
                                  
Since I get a little sneak peek at the upcoming paper lines (one bonus of being a store owner!!), I had some die cut pieces in my stash and used one of them to decorate the front of my box.  I then layered the Poppy Patch die over the die cut (doesn't that look great in the black grid paper??)  Added a butterfly (Martha) and sentiment, from Sweet 'n Sassy.
The inside of my box holds six chipboard tags.  I decorated each tag with black cardstock and then created pockets by cutting a piece of designer paper in half, diagonally.  I decorated each tag with more fun die cuts, rhinestone swirls, buttons, and more butterflies.
Inside each pocket I created a tag with one of the many sentiments in my stash from Tim...I love his sentiment stamps!  I first lightly stamped this worn background on the white and then added the sentiment in black.  The top of each tag got a little tab (a SU! punch), which held a butterfly or button.

This was a great project, super easy and fun, and I'm so excited to have my box of creative phrases sitting on my desk!

So...what will you alter?  You have two weeks to submit a project....Go get busy, visit us on the eP blog, and share your creation!  Can't wait to see your work!

Wednesday, January 9, 2013

Sweet 'n Sassy Release Day - Cute Critters

Hi everyone and welcome to our last sneak peek release day for Sweet 'n Sassy!  Have you been having an amzing time on each day's hops?  I have loved seeing all of the creations by our super talented design team!  Be sure to check the SNSS blog for all of the release and hop details!
 
Today's set is called Cute Critters and it is indeed cute...super cute!  I adore the sweet animal stamps and coordinating sentiments.  Great for so many projects!  For my project, I decided to make Valentine's for my kids.  We don't typically do much for Valentine's Day but I usually make both of my boys a handmade Valentine that tells them how much I love them.  (They both still have all of theirs tacked up to their bedroom walls!  So sweet!)
I created each Valentine with the same design and simply changed out the animal and sentiment.  I started by stamping the Friendship Script background stamp on kraft cardstock (oh, these are all ATC size, 2.5" x 3.5").  I then die cut a heart, using the Hearts die set, and ran it through an embossing folder.  Next the fussy-cut critter was colored with Copics and attached to the heart, using foam tape, and the sentiment was added!  Perfect size for my young children and enough room on the back for me to write a little note to each of them...I can't wait for February 14!

I hope you enjoyed today's post and enjoy the hop!

Tuesday, January 8, 2013

Sweet 'n Sassy Release - Bottom of My Heart

We're back for day four of the Sweet 'n Sassy release week celebration!!  Are you having the greatest time?!  Oh my, I love seeing the new sets each day...so much crafty goodness!!  Be sure to check out all of the release details on the SNSS blog before starting on your mini blog hop journey!

As you can tell by my numerous cards for today's post...I love this heart set!  I love even more that there is a coordinating die set!!  I couldn't even stop creating once I opened the Bottom of My Heart stamps...the different heart sizes, the patterns...what's not to love!

For my first card, I decided to combine my new love of stencils with my ongoing love of stamps.  I started by using the Mini Splats stencil and Black Soot Distress Ink to create my faux ink splat...isn't that fun!  Then I embossed one of the hearts, using white embossing powder on black cardstock.  Cut out the heart and added the sentiment..in red...love the white, black, and red color combo.
 Next I wanted to create a more masculine card...'cause it's my anniversary tomorrow and I need a card for my hubby.  One that isn't too frilly since he's a manly man. :-)  I started by covering a piece of cardstock with metal tape, then I ran the cardstock through my Vagabond using this fun embossing folder from Tim.  I attached the metal piece to the card with foam tape and added my red heart right in the middle.  And yes...after 14 years of marriage and two kids, he still makes my heart skip a beat...
My last card gets a bit more girly and combines fun colors and textures.  I used the XO stamp to create a bakcground in Spun Sugar Distress Ink and then layered three hearts.  Just needed to add a sentiment and add the panel to a card base.

Wasn't that a fun set!  Now head on over to the Sweet 'n Sassy store to place your order for the set and die! 

Enjoy!!

Sunday, January 6, 2013

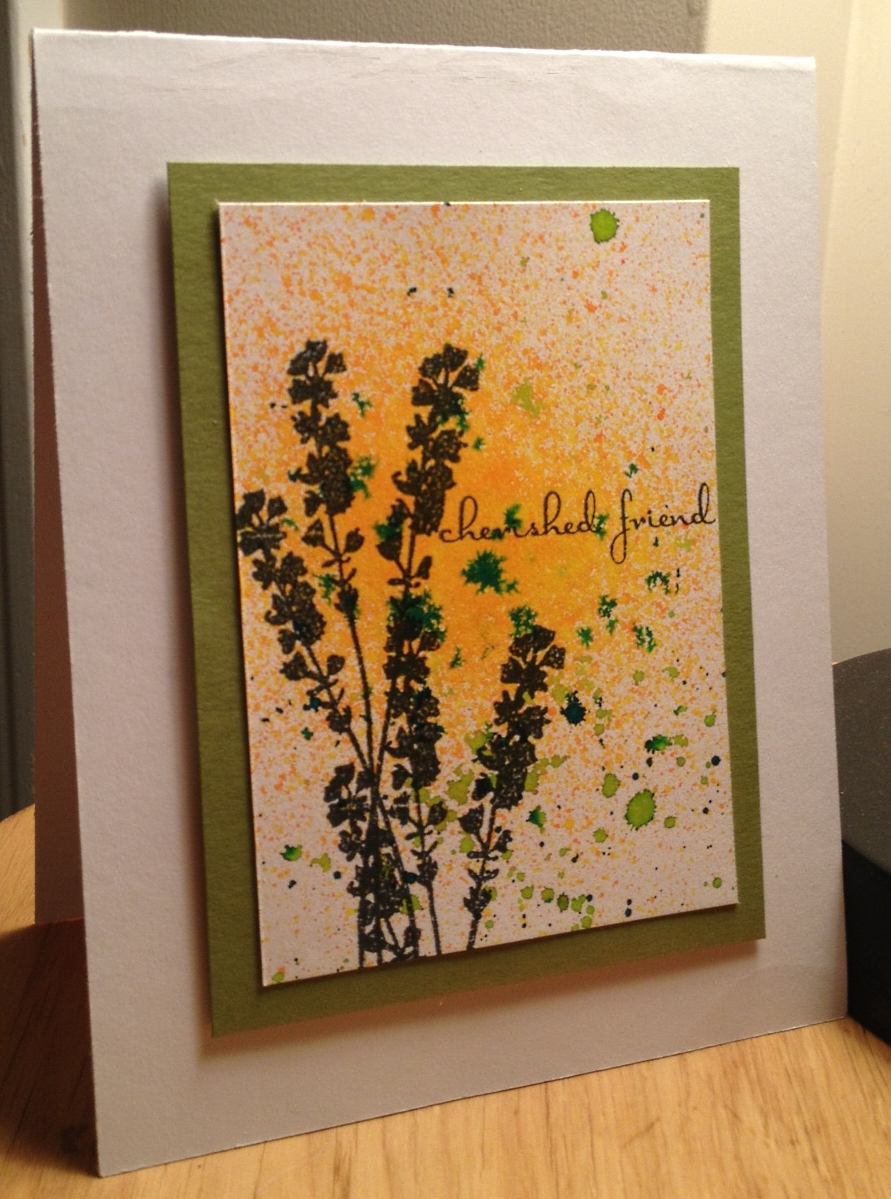
Sweet 'n Sassy Release Day - Long Stem Silhouettes

Welcome to the next day of the Sweet 'n Sassy release week celebration!  Today we're showcasing the brand new Long Stem Silhouettes.  I am a huge fan of silhouette images so I was super excited to receive this new set in the mail (and I've already found a million other uses for the wonderful sentiments!)  I loved this set so much, I made two cards for the release!  Yippee!!  Be sure to check by the Sweet 'n Sassy blog to get all of the details on the releases and prizes!
 
For my first card, I decided to have a little fun with my Dylusions Ink Sprays.  I wanted to create a bit of a sunset background without using my traditional Distress Ink and blending tool.  I simply spritzed Squeezed Orange, Fresh Lime, and just a hint of Vibrant Turquoise onto a piece of cardstock, hit the ink with a heat gun to quickly dry, and stamped the image in black right on top of the ink.  A sentiment was all that was needed to finish this CAS card.  Love that bright lime color!
 
My second card features more of the images included in the set and I started by stamping the first image in white, the second in Walnut Stain, and the third in black.  I love this color combo on kraft cardstock.  I simply added a tiny butterfly (Martha Stewart punch) to finish the card.  The card background?  Well that's paper from the Echo Park Documented paper pad, and this was a card base I created months ago.  I never finished the card and when I finished the main image of today's card I realized it fit perfectly on the base!  Hey...never throw out that cardstock that never quite makes it into a card!
 
Enjoy today's hop!