photo kime5_zps3df5231d.png  photo kime6_zpsa90859c6.png  photo kime7_zps9d2ef86d.png  photo kime9_zpsb23b4278.png
Showing posts with label seth apter. Show all posts

Monday, August 15, 2016

Thankful Scrapbook Page Featuring The Crafters Workshop Products

Hi friends! Today I'm sharing one of my Crafters Workshop projects that I created a few months ago. (To be honest, I have so many things to share...I just need to find some time to blog! And...I've been working on creating videos! Need to work through my technical issues, mostly with my very old and slow PC, but am hoping to have some new videos to share soon...stay tuned!!) OK, back to the project!

I'm sharing a step-by-step tutorial of how I created this scrapbook page...it was super easy!
I started with a piece of 12x12 cardstock, the Zia Sun Bit (TCW2016) and three coordinating Dylusions Ink Sprays. I laid the mask on the paper, gave one good spritz with an ink spray, and then moved the mask, and sprayed again with a different color. Here's the first half of my page:
Next, I used the Tribal Fish (TCW594) stencil, three more coordinating ink sprays and followed the same steps listed above.

Once my ink sprays were completely dry, I added some stamping using the brand new Seth Apter stamps...LOVE them...by stamping in black Archival Ink. Next, I selected my photo and added a bunch of designer papers and embellishments. It's really all about layering papers, die cuts, words, pins, whatever you have on hand. Here are a few close up shots of my completed scrapbook page...A list of the products I used, stencils, stamps, etc. are linked at the end of the post.


Thanks so much for joining me today! Happy Crafting!

Supplies:
-Tribal Fish Stencil (The Crafters Workshop)
-Zia Sun Bit (The Crafters Workshop)

Friday, January 23, 2015

Choose Joy

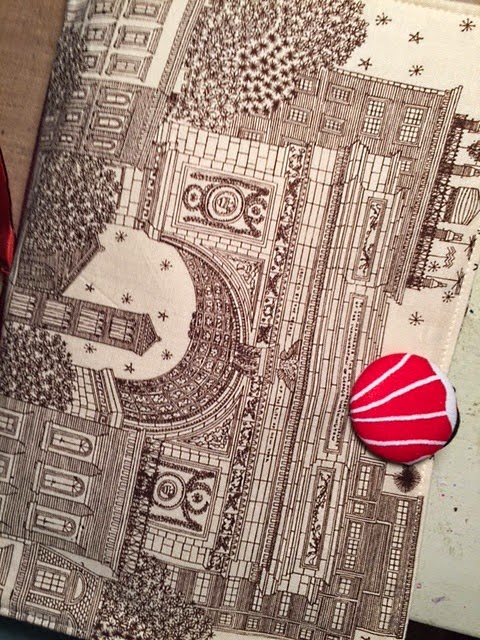
I spent part of the weekend with some of my favorite art supplies...Wendy Vecchi embossing paste, stencils (from Donna Downey and Seth Apter), and Dina Wakley paints...and I created a fun new art journal page.  To start, I picked up a Donna Downey art journal before Christmas (Merry Christmas to me!) and I love it...check out the pretty fabric cover...
 This is a small journal...around 6x9...and I love the smaller size; feels much more manageable when creating vs. tackling a 9x12 or larger piece of paper.  Also, the inside pages are super thick and sturdy and each page has an inclusion.  I'm really happy with this journal and imagine I'll be purchasing more of them in the future.

 A few weeks ago, Donna included a photo of one of her projects in a recent email blast about her new Inspiration Wednesday videos.  I loved the texture of her piece so I set out to create something similar.  I don't know how Donna created her piece, but these are the steps that I took to make my pages.  


I started by using a palette knife to add embossing paste over the entire background of my page and the inclusion.  I allowed this to dry overnight (it was thick!)  I then went back and used stencils and more embossing paste to add a second layer.  Allow to dry overnight.  Next, I gesso'd over all of the pages and paste.  Once that I was dry, I added my paint, starting with Dina Wakley's Night.  Once the first paint layer was dry, I mixed Dina's Turquoise paint and glazing fluid together (equal parts) and applied the paint over almost all of the Night painted pages.  Allow the Turquoise to sit for about a minute and then use a baby wipe to remove some of the Turquoise paint.  (This is a technique I learned from Donna Downey)
 The last layer was a combination of Dina's Tangerine paint mixed with Golden's Burnt Sienna.  This layer was lightly brushed on and then I used a baby wipe to blend.  The last thing I did was add a quote (from a Wendy Vecchi stamp set) and date tag, ala Donna Downey.  (I have to share that I love adding those dates tags...it is so much fun to go back through your journal pages and see what you were creating on a certain date.  Very cool way to see how your art progresses.)
When I finished both pages I thought, "hey, this looks like a Seth Apter page!"  Just goes to how we're influenced by the artist's work we most admire.  This ended up reminding me of the 52 Card Pick Up class that I took with Seth...very similar colors...and the texture is all Donna Downey.  And I love all of the texture...embossing paste to the rescue, that stuff is AWESOME, thank you Wendy Vecchi!  Now that my first pages are done, it's time to get to work on the rest of my journal...

Friday, October 24, 2014

Soar

One of my latest altered playing cards.  The background was created with black gesso and acrylic paints mixed with glazing medium.  Stamps are from Just Johanna, which is a company that has sadly gone out of business...she had the most fun images.  Many of the JJ stamps were very small so they're just perfect for the small size of my deck of altered cards.  I journal on the back of each card...I'm looking forward to completing all 52 and creating a book of memories and thoughts...kind of like a diary but way more fun to create!

Thursday, September 18, 2014

Studio Table with Seth Apter

I'm joining with Seth Apter, and a whole bunch of other artists (visit Seth's blog for the full list), to share what our studio spaces really look like...well...at least those of us who create with abandon.  Maybe that should be create without any care for the mess I leave behind! LOL!  And so...I present to you...what the inside of my studio really looks like...
That's right...I work an 8x8 room that is located off of my dining room (shame that any guests have to look upon such a mess when they're enjoying dinner...oh wait, we usually eat in the living room because my dining room table is covered with school books...never mind...)  My hubby built in the narrow L-shaped desk so I could get the most out of the floor space.  And I have the majority of my supplies (I know it looks like the supplies are just on the floor) stored in a huge, antique wardrobe.

When I work...I simply toss used supplies on to the floor.  Or, as you can see above, I put what I might want to use on the floor next to my stool so I can look through them.  Wendy Vecchi stamp sets anyone?
Here's my pile of half finished projects...let's see, we have some mini albums, some cards, magazines to read, a big bag of supplies from my last class to be emptied, and projects from a March retailer event to finish.
And that tiny space, housing the blue art journal pages, is what I typically work in...what's that about two square feet of work space?  And that piece of wood you see poking out from the shelf in the upper right hand side of the photo is what holds my camera when I create videos.  Can you even believe it? LOL!  The good thing about having a smalls space is that it does clean up quickly and everything I use is very (very) close at hand!

That, my friends, is an unashamed look at what my studio looks like on any given day.  And about twice a year I can't take it anymore and I go on a major cleaning spree...that hasn't happened yet this year...maybe for Christmas...

Want to check out my videos?  You can see my You Tube channel, here, it's packed full of technique videos!

Saturday, July 5, 2014

Altered Playing Cards

 In early June, I had the pleasure of meeting Seth Apter for the first time after emailing with him for many months regarding a class that he was going to teach at the studio.  And every once in a while I decide to take a class at my own studio...'cause that's one of the fun things about store ownership!  I knew immediately that I wanted to take Seth's class...altered playing cards.  Seriously, how much fun is altering 52 cards...tiny little works of art...I couldn't pass up the opportunity to learn about Seth's style of creating.  And I was not disappointed.  Seth is a great instructor...we all had an amazing time in class.  Thanks, Seth!

Today, I'm sharing two of my favorite cards that I've finished. I think I've finished five or six so far in total and the goal is to complete at least one a week for an entire year.  Humm...I better get busy on finishing a few!

During the class, we mostly focused on creating the paint layers on the cards and just barely scratched the surface on finishing the decorating.  We started by covering all of our cards with black gesso.  I initially only covered once side, loving the look of the card backs, but have ended up applying gesso to most of the backs as I've been using that space for journaling.  We all arrived with pre-gesso'd cards and then got to work on adding more paint.  Seth likes to mix his acrylics with glazing fluid, which makes the paint translucent.  This allows you to apply multiple colors of paint, while still being able to see some of the black (or other colors) on the card base.  The glazing fluid also leaves the card with a lovely shine...not too glossy but just a hint.  Great contrast between the matte finish of the gesso.  Once our paint layers were dry (and if I did this again, I'd add more color.  These are a bit too dark for my taste but I do like the pop of bright teal!), we used stencils and other objects to add a bit more design.  Of course I had to add splatter to every card!
 Once I got home I was a bit obsessed with finishing some cards...once those ideas start, it's hard to not run to the studio and forget all about feeding the family and cleaning the house!  I grabbed some vintage papers and added a bit of text to most of my cards (the house on the first card and the circles on the second) and I even dug through some of my old scrapbooking stash and found some great little icons to use on the card, like this doll that I aged and added a glitter heart.  I'm thinking that these cards are the perfect canvas for using up old lettering and other misc. pieces that have been forgotten.  I can't wait to make more and then end up with 52 completed cards...a tiny diary of life over the past year...I think it's time to get back in to the studio...

Enjoy and check out supply links below!

Acrylic Paints (PaperArtsy are the perfect choice)


Wednesday, June 12, 2013

Buried Treasure Blog Hop

Greetings everyone and welcome to just one of the many blogs along the Buried Treasure Blog Hop!  I'm so excited that Seth has set aside a day for many bloggers, designers, and artists to join together and share some of their favorite projects!  I hope you enjoy the hop and are inspired to get out there and create!  (Be sure to visit Seth's blog for the full blog list!)

I've been designing, teaching, and blogging for almost seven years so it was tricky to decide what to post...there's probably been more work that I'm critical of than those projects that I love so I thought I'd focus on a few firsts instead of just finding one project that I love...

The Be You frame above is the first time I played with Wendy Vecchi's products and I confess...I loved every bit of it!  I love that her stamps coordinate with her Art Parts.  And I love that big 'ol heart stencil...it's one of my favs (as you'll soon see!)  I created this frame just a few months after purchasing eclectic Paperie and to have Wendy join our team in a blog hop was a very special treat.  Sending BIG hugs Wendy's way!!  (See the bottom of my post for product links)
My second project is of the very first art journal page that I really loved.  Mixed media and art journaling was completely foreign to me when I bought the store but our customers were hard pressed to get their hands on good mixed media products (and I don't blame them!)  Since I knew it would be difficult to endorse products I hadn't personally used, I knew I had to start investigating this new medium.  It took some time for me to really get comfortable but the more I played with products, the more I got it, and now that I have it, I don't want to stop!  Art journaling is truly an inspiring and exciting form of art.  I love all of the variety, I love how free form it can be, and I love how vastly different one person's can work look from another's...it's just a blast!
Ahhh...a card...that form that is so familiar to me...This was one of the first cards I created for the Splitcoaststampers Clean and Simple design team.  I tried out for that team so many times...maybe six, over a two or three year period.  Seriously, when someone told me about trying out again I thought, "I'm done...no way am I trying again, I'm all over the making it almost to the end and then not getting picked thing..."  And I had just bought the store..."no time!" I said.  But...I did it...I tried out...just one more time.  I made it...It really was pretty darn exciting and I'm so glad that I gave it one more try and didn't give up.  Great time and a great time striving to stay with clean and simple designs...it's not as easy as it looks!
 Scrapbooking...never something that interested me and then I 1) got picked to be on a design team where they wanted me to create scrapbook pages and 2) I started to work at a scrapbook store so...I thought I'd give it a try!  While I'll probably never be a full blown scrapbooker, even though I think it's an amazing art form and fabulous way to document your life, I do have just a hand full of pages that I really love and this is one of them...and it's of my mom, which is super special to me as she passed away when I was quite young.  This one is a keeper...and it uses special paper from Graphic 45...Bonus!
Another first...starting to combine some of the mixed media techniques I've learned with stamping and with a clean and simple design.  How perfect...the best of all worlds!  This is a gesso resist technique combined with beautiful silhouette stamps from Sweet 'n Sassy.  The bright colors against the pure white background is perfect and this is one of my all time favorite types of cards to create...clean lines, dark images, and just a hint of grunge.  Divine!
 
Well I hope you've enjoyed our little journey...don't be afraid to try something new...you never know what awaits you...
 
Be sure to leave a comment on this blog post and those blogs listed below for an opportunity to win a product prize package from eclectic Paperie!
 
 
Supply List:
Wendy Vecchi Products - Stamps, Stencils and Art Parts
Autumn Blueprint Stamp Set