photo kime5_zps3df5231d.png  photo kime6_zpsa90859c6.png  photo kime7_zps9d2ef86d.png  photo kime9_zpsb23b4278.png
Showing posts with label canvas. Show all posts

Friday, July 7, 2017

Joggles Mixed Media Canvas


Hi friends! I'm over on the Joggles blog today, sharing a mixed media canvas I created using some of their Flora & Frond stencils and masks. You can also watch my process video below. Enjoy!

Friday, June 30, 2017

Stained Glass Daisies Canvas

Hello crafty friends! I'm sharing a new project over on The Crafters Workshop blog today. Head on over and check out all of the details and project links. You can also view my process video below.

Tuesday, March 7, 2017

Let Your Light Shine Canvas

I'm sharing a fun project over on the Crafters Workshop blog today. Head on over to check out all of the details!

You can also video my technique video here:

Thursday, August 25, 2016

Rejoice Canvas

Hi friends! Just a quick post today to let you know that this project was posted on The Crafters Workshop blog yesterday. This canvas features brand new stencils and mediums, Gold Gesso (yes, GOLD, LOVE it!), and Modeling Paste. Links to the specific TCW products listed below. Head on over to the TCW blog for more photos and step by step directions.

Happy Crafting!

Supplies:

Monday, September 21, 2015

If it doesn't challenge you...

Hi friends! I have a fun 8x10 canvas project to share with you today. This was a very simple project that came together in about an hour...grab your stamps and paint, and let's get started!

First, I want to share that I created this canvas piece to be a journal cover for my very first junque journal. Julie Fei-Fan Balzer teaches an online Junque Journal class, and I signed up for it last week. If you have tons of half painted papers hanging around your studio, you MUST sign up for this class! I was able to bind together almost 100 pieces of random papers into two journals. This is an amazing class given by an amazing teacher...Go sign up, just do it!

OK, back to our regularly scheduled program...
I started with a canvas panel from Dick Blick (you can buy these in bulk for short money, click here for the link), two Distress Paints (Wild Honey and Ripe Persimmon), and a water bottle.

I painted the top portion with the Wild Honey and the bottom with Ripe Persimmon. Then the entire canvas was spritzed with water (start at the top of the canvas). The Distress Paints react with water and beautiful mixing will take place...yummy. (I'm not sure why there are small open areas, where the paint didn't seem to cover completely, but I don't care...love the look!)
Next, I stamped this stunning, gigantic poppy image, from Donna Downey (You Are Important), on the canvas using VersaMark ink and embossing with Black Soot Distress Powder. Donna's stamps are perfect for art journaling and canvases because they are HUGE. This stamp is approximately 7" tall!
I painted the poppy image with more Distress Paint (Festive Berried and Abandoned Coral). I used a paint brush to apply the paint and then spritzed the still wet paint to get it to run outside of the lines of the flower. (Tip: When Distress Paint is dry it is permanent, it will not react with water so if you want the paint to flow, you must spritz while the paint is still wet.) After the paint was dry, I used a paint brush to outline the flower. Since I did the outlining by hand, vs. re-stamping the image, I got a nice painterly look. And now, for an important public service announcement...
I've taken countless classes with Tim (Holtz), and during every class he reminds attendees to NOT squeeze the paint bottles. "Don't squeeze the bottles, don't squeeze the bottles..." And every time, someone squeezes the bottle and paint goes all over the place. I teach classes, and shoot videos, all the while saying, "Don't squeeze the bottle..." Guess what I did tonight? I squeezed the bottle... Don't be like me...and do not squeeze those darn bottles!
After I cleaned up that big 'ol paint mess, I added some stenciling to my canvas. (I used Wendy Vecchi's Archival Inks for all of my stenciling.) The leaf stencil is from Wendy Vecchi, Lovely Leaves, and the number design is the Mini Number Repeat from Donna Downey. 
For the final step, I added more stenciling, using Wendy's embossing paste and the Believe Script stencil from The Crafters Workshop. I stamped the sentiment, included in the You Are Important stamp set from Donna Downey, and added a touch of Potting Soil Archival Ink, using a blending tool, to the edges. The sentiment is a bit further to the right than normal because this is going to be a journal cover and the binding will cover up a portion of the left hand side of the canvas. As soon as I get the journal together, I'll take a video to share the goodness! Oh, and I did add just a few tiny splashes of Festive Berries paint to the entire canvas!

Monday, November 10, 2014

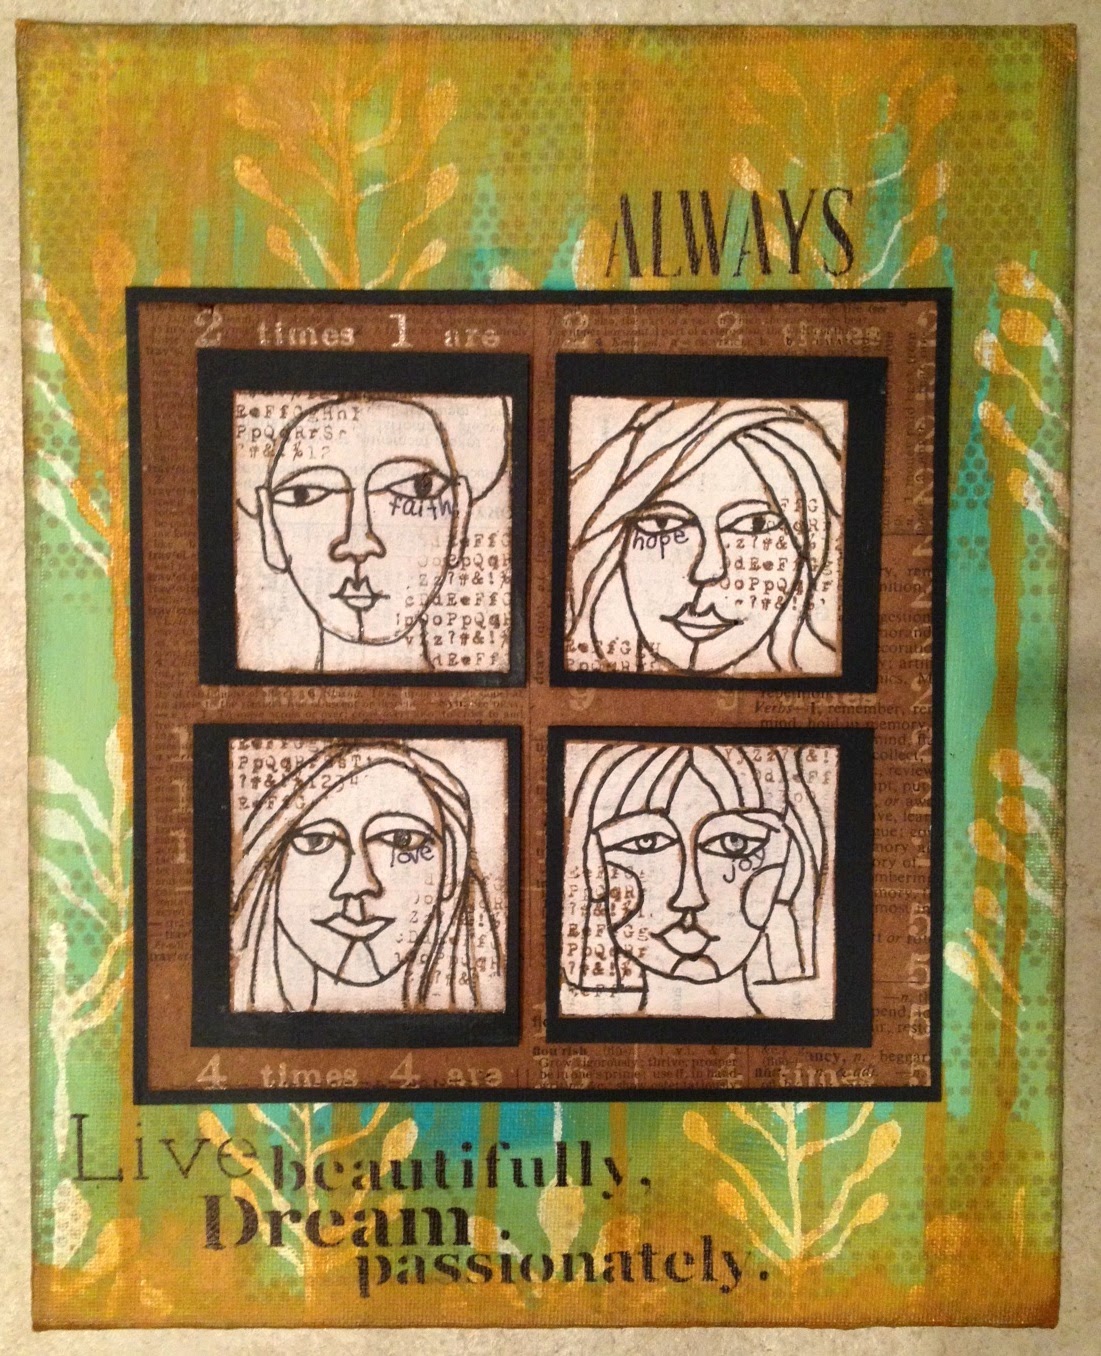
Live Beautifully


I had some time to create last night (yeah!) and I made a canvas based upon a piece of artwork I saw a few weeks ago...  I even made a video documenting the process and chatting about finding inspiration.  See below (product links below as well):

Product Links:
Prima Stencil (out of stock)


Friday, November 7, 2014

She Had a Dream

I know...I'm either posting a few times a week or not at all...I need some consistency!  (What I really need is some free time...LOL!)  I find some of that missing time yesterday afternoon and whipped up a sweet little Wendy Vecchi inspired wall hanging.  I also managed a sweet photo tutorial...Enjoy!
I've had this stash of goodies sitting on my desk for months.  Piled up, just like this, a pile of left over bits that I wanted to use to make a tiny burlap canvas.  I've moved these bits about a million times in order to get to some other object and today was the day I sat down and finally make art. (Links to all products at the end of the post).  The main cast of characters were some Art Parts from Wendy, a tiny burlap canvas, and some trinkets from Tim Holtz.
I started by applying a few shades of Distress Paint to my burlap canvas.  Just shake the bottle, open it, and start applying paint.  Great way to add just a hint of color.
And because nothing I make can be without a text circle...I added a text circle from a vintage book full of poems....swoon...The edges were distressed with Gathered Twigs Ink.
Next up were my Art Parts, using Wendy's Archival Inks.  I applied color with a blending tool.
Know what I love about Wendy's product line?  Coordinating Art Parts and stamps!!  To perfectly stamp an image on to a coordinating Art Part, apply Archival Ink to the stamp, keeping it stamp side up on your craft sheet.  Then press the Art Part into the ink on the stamp.  Much easier than trying to line up the stamp on top of the Art Part. Make sense? (Don't mind the ink on the back of my Art Part...I colored the wrong side! Doh!)
Here's the stamped Art Part! Isn't that the greatest trick ever!
I used black Enamel Accents to highlight the flower centers and set these pieces aside to dry.
I embossed the little bottle using Wendy's new embossing powders.  Just roll the bottle in Archival Ink and then in the embossing powder.  You will want clips to hold the bottle while you emboss and don't hold the heat gun in one spot for too long...keep it moving!  Hold the bottle while it cools to the touch.  Love how the powder doesn't adhere in every spot...so vintage!
To further decorate the bottle, I inked up a stamp from the Say it with Art stamp set and carefully rolled the bottle over the stamp.  Viola, instant design!  Give the ink a quick heat set before continuing.
And then...I assembled!  I added some twine to my tiny bottle, along with a tiny blackbird.  The two Art Parts were layered, using 3-D glue dots for great dimension.  Lastly, I added the sentiment and a ribbon, attached with brads (just through the ribbon and then glued to the side of the canvas), for hanging.  Now to find the perfect spot in my studio for displaying...

Want to purchase the products I used to create this project?  Follow the links below: (REMINDER - eclectic Paperie is offering a storewide 30% off sale.  Use code EP30 when checking out!)
Burlap Canvas
Distress Paint
Forever Art stamp set
Forever Coordinates (Art Parts)
License Plate Art stamp set
Say it with Art stamp set
Archival Inks
Embossing Powders
 

Monday, October 20, 2014

Bloom

Sometime last year I registered for an online Donna Downey class, to create the above painting.  I loved how Donna used a stencil to create the face...seriously, so much easier than drawing by hand, and how her hair was primarily constructed of flowers...me, faces, and flowers?  Why, yes, that's a fabulous combination!  (You can sign up for this same class here)  This stencil is called Three Quarter is was designed by Julie Fei-Fan Balzer.  You can see a video of Julie demonstrating how to use these stencils here.
 
 While I was really happy with my final results, a year later, I can see so many areas where I would have done things differently.  However, the one area that I adore is actually the canvas background, which was created by first randomly applying Wendy Vecchi's white embossing paste.  I love how the paste looks once you apply paint (after the paste is dry)...like a chipped wall in an old building...be still my heart!  I also added some stenciling using another Wendy Vecchi item, the Classic Words stencil (one of my favs!)  The Bloom is from the Artful Thoughts stencil.  I'm also really partial to all of the dots on the flowers...adds such a fun element.

Overall, I really enjoyed this class and am looking forward to finding a place to display my blooming lady...

Monday, June 23, 2014

eclectic Paperie and Add a Little Dazzle Blog Hop


Welcome to our joint blog hop with Add a Little Dazzle. We are so excited to partner with them and have had so much fun playing with their products.  They have a beautiful collection of metal sheets, in a variety of colors, that are perfect for mixed media projects. Both design teams have combined our products and are ready to share some inspirational projects with you. Join in on the fun and make sure to enter for a chance to win an amazing prize.
Welcome to Day 1 of  the Eclectic Paperie & Add a Little Dazzle joint blog hop! We’re so excited to be sharing some fabulous creations featuring the wonderful products from both companies in today’s hop. We have two amazing days of inspirational projects so make sure to stop by tomorrow.

First we’d like to share a little bit about the two companies…


eclectic Paperie is a different breed of craft store, conceived as more than just a place where you can purchase supplies, we believe in the strength of collaboration, in coming together and sharing with like-minded crafters. Our goal is to offer a mixed media marketplace where a generation of artists can congregate, explore, imagine, and inspire one another.

Add a Little Dazzle specializes in an exclusive line of craft metal sheets that helps you take your crafting to the next level. Whether you are a seasoned or new crafter, our craft metal sheets will help you create unique projects that will make you stand out among the crowd. Are you ready to take your crafting to the next level? Add a Little Dazzle Craft Metal Sheets will help you turn the ordinary into the extraordinary.

Prize Alert!

Make sure to stop by and visit each of the Design Team Blogs for a chance to win 1 of 2 prize packages from eclectic Paperie and Add a Little Dazzle  valued at $25.  You have until Friday, June 27th to enter.  The winners will be announced on both blogs on Saturday, June 28th.  You must leave a comment on all blogs.

   Are You Ready for Some Amazing Inspiration?
I had the opportunity to play with Add a Little Dazzle metal sheets and few months ago and I fell in love with their product!  The sheets are super easy to cut, emboss, and paint (among a million other things!)  And I love how many colors are available.  For my project, I decided to create a canvas and wait until you see the transformation of where I started and where I ended up! And...eP is now carrying a variety of metal sheets, you can find our offering here!

My first step was the cover a canvas board with torn vintage book paper (this paper is from the 1800's!).  I attached the paper using matte medium.  I think added white embossing paste through a stencil (this one is called Echoes).
Then I got all crazy and added some paint and sprays from Art Anthology, which I really liked but...I took one too many steps, adding another stencil design with some Art Anthology paint, and while I loved the beautiful paint colors, I was not happy with the design...too busy! 
So...I applied gesso and acrylic paint over the entire surface (when in doubt, just add gesso!)  The embossing paste AND the Art Anthology paints, which are dimensional when dry, added amazing texture.  I added aqua and grey paint, leaving some of the white gesso showing.
Next, I used more white gesso and another stencil (Tim's Schoolhouse layering stencil) to add some white to the background.  Some watered down Art Anthology paint (in Fairy) was perfect for adding some splats.  (And the Art Anthology paint dries glossy so the matte/glossy contrast is great!)  I added some black Archival Ink, using a blending tool, around the edges.
I then used more of that book text, mounted on chipboard, to create a base for my photo.  A piece of black cardstock, with more of the Schoolhouse stenciling, was my second layer.  Before adding the photo (yes, that's me on the right at about six years of age, with my mom and brother) I added a big 'ol green drip.
Then I got to work with my metal sheets.  I first die cut the flower shape with an older Tim Holtz die and embossed the flowers using an embossing folder.  I used Tim's "flower making method" to create the layered rose.  I used black paint to go over the embossed flower (before assembling) and then used a paper towel and sanding block to remove some of the paint.  I also used a greenery die to cut out all of the leaves from a white metal sheet and covered some of the leaves with Inka Gold (Green/Yellow).  The metal sheets are so easy to work with and adding little bends creates a more realistic flower/leaf.

All that was left was assembly!  I used glue dots to attach all of my metal pieces to the canvas and they seem to be holding beautifully (the metal is very lightweight).  You could also use a hot glue gun.  The sentiment is a portion of a Tim Holtz saying, which I just stamped on a manila tag, cut out and attached with Glossy Accents.
That's it for my project!  Ready for more?  Check out each of the links below, which will take you to members of the eclectic Paperie and Add a Little Dazzle design team blogs. And don't forgot to leave a comment on each blog so you'll be entered into the prize drawing for a $25 gift certificate, given away by each company!!  Enjoy!!

Monday, June 25, 2012

Wishing you a Beautiful Day


Happy Monday everyone!! 

Today's card came about after looking through a book that I purchased for my boys yesterday...a mini Smash book. (Who has jumped on the Smash book bandwagon??) I thought the Smash books would be a great spot for them to jot down some of their summer memories. Both of them have already filled out a few pages and added some stickers.

One of the Smash book pages was covered with a beautiful rainbow of colors that looked as if someone had watercolored right on the page. When I saw the page I immediately imagined this card!

To create the card I used Distress Stains to color on a piece of sticky backed canvas. Once the stains were dry (you can speed up this process with a heat gun), I stamped my images directly onto the canvas. I started with the Friendship Script stamp, which I stamped in Pumice Stone Distress Ink and then I added a flower image, also stamped in Pumice Stone and Black Soot, from the Nature Silhouettes stamp set. Next, I frayed the edges of the canvas by pulling out a few of the strings from each side of the sqaure. My card was assembled and then I added this great sentiment from the new Make a Wish stamp set.

Super fun card to create and a super fun way to start the week! How about you? Have you tried out any of our Silhouette stamp sets yet? They're great paired with colorful backgrounds. Here are links to some of my favorites that are perfect for all of your summer crafty projects!
-Nature Silhouettes
-Together Silhouettes
-Serene Silhouettes
-Polka Dot Silhouettes

Enjoy!