photo kime5_zps3df5231d.png  photo kime6_zpsa90859c6.png  photo kime7_zps9d2ef86d.png  photo kime9_zpsb23b4278.png

Monday, March 28, 2016

Playing with Distress Crayons

Of the products that were released during this year's CHA, Distress Crayons (yes, I bought every color!) were one of the products I was most excited to try. My CHA pre-orders from The Funkie Junkie arrived a few weeks ago, and I finally had an opportunity to play with the new crayons.

Since I was just trying them out I opted to grab a tag and apply a few different colors. Here's what I found...

1) They blend better on paper with your fingers vs. a water brush. The water brush didn't really move the color around that well once it was applied to the tag.
2) Using a baby wipe gives you amazing blend-able results.
3) Laying a stencil over the colored tag and then removing some of the color with a baby wipe is divine!
4) The colors blend really well together without becoming too muddy. (You can even blend two colors together for a third color!)
5) The crayons are super creamy and applying more pressure produces deeper colors and better final results.
6) Final verdict? Super fun product, can't wait to use them in my art journals!

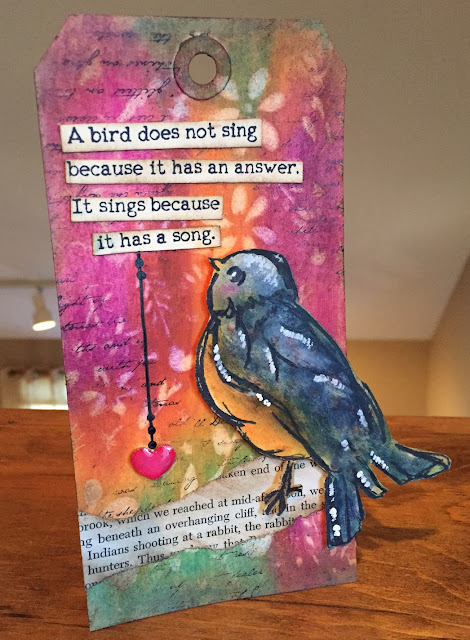
For this tag, I scribbled a few crayon colors directly onto the tag, and blended slightly with my finger. A laid a stencil over the tag and then used a baby wipe to rub some of the color off of the tag. You're left with this beautiful watercolor look. I then used a script stamp and jet black archival ink to add some stamping to the background.

The bird is from Dina Wakley's Scribbly Birds stamp set (see product links below), and I again used the crayons to add color to the bird, just blending with my finger.

Vintage text paper gave my bird a "branch" upon which to perch, and the sentiment (from the same stamp set) was stamped on a tag, cut out and attached with liquid glue. That teeny heart is another one of my favorite CHA releases...Wendy Vecchi's Mat Mini Hearts! Oh man, I love these heart! Super thick chipboard that is simply inked with Wendy's Archival Inks, then a hint of glossy accents added for some great shine.

Hope you enjoyed today's project...now go out and grab yourself some Distress Crayons! Here's where you can shop for these products...

Supplies:

Friday, March 18, 2016

Inspiration Wednesday - Week 5

Hello strangers! Sorry for the long absence from my blog. I actually have a lot to share, just haven't had a lot of time to write and upload photos. Hard to find time for everything lately as I have some big news, which the quote included in my week five Inspiration Wednesday project kind of alludes to...
Get ready because it's a doozey! We're moving back to NH! That's right...our time in CT is to be short lived. We don't have a specific time frame yet as we need to find a home, but my hubby starts a new job in a few weeks.

This certainly wasn't part of our plans. I mean who moves state-to-state twice in six months?! That's craziness! And I'm still trying to wrap my brain around it, but it seems to be the way that things have worked out. (Unless there's another plot twist around the corner...oh man, I hope not!) 

Long story short, the new job here wasn't working out. My husband loved the work, but there were some other issues that were unable to be resolved. We knew that a job change was in the near future, but we didn't know how near. He was contacted by someone he interviewed with over the summer, who is now ready to hire. It's a great opportunity and I'm so excited for him! Of course this means we need to go through the entire moving process again, but I couldn't be happier! I'll dearly miss some folks we've become friends with in CT, but I feel that we're returning to our home. And I suspect that we'll be back in CT for many vacations in the coming years...

Now on to this week's project!
This was a tough week for me...I reworked these pages a bunch before I was happy. Donna had used a giant number stencil on her page, but I didn't have anything similar so I went with the heart texture stencil (from Donna Downey), which didn't work quite as well as the letters were a little small.

There are many layers of paint on these pages...paint, glazing medium, more paint, and a new product from Finnabair, Thick Modeling Paste.
Once my many layers were dry I added a hint of black by using a few Crafters Workshop stencils. My favorite part of this project are the tiny bits of teal showing through on the pages and the heart. Oh, I used a 3D Gloss Gel for the heart, which is a new Prima product. Want step-by-step instructions for creating a similar project, check out Donna Downey's Inspiration Wednesday videos. It's only $35 for 25 classes! Interested in supplies I used? Check out the links below:

Supplies:
-Prima Art Basics (3D Gloss Gel and Thick Modeling Paste)

Thursday, March 3, 2016

Jumping on the Bird Crazy Bandwagon

I've finally done it..given in to the Bird Crazy craze! If you don't know about these fun bird images then where have you been for the past two years?! LOL! I fought it long and hard, but I finally found myself too drawn to these silly faces to resist any longer...

Tim Holtz introduced the Bird Crazy stamp set probably two years ago, maybe less, and the demand for them took off like mad. He then introduced coordinating dies and accessories. And now I see these birds on craft blogs all over the internet land!

When these were first released, I still owned eclectic Paperie and I honestly had a hard time keeping the stamps and dies in stock...it was madness! Once I started the closing process, I managed to tuck one stamp set and one die set into my stash...you know, just in case. Almost a year later...I finally pulled them out to create a card for my son's upcoming birthday. (I think this bird is has a slight resemblance those Angry Birds so I know my son is going to love this card!)

My card began with a healthy dose of Wendy Vecchi's embossing paste and a Dina Wakley stencil. Once the paste was dry I added some water and applied ink from Tim's Distress Markers. Adding more water made the ink from the markers run in between all of the non-paste surfaces...dreamy. (I used Ranger watercolor paper for this process)

My bird was stamped on another piece of watercolor paper and die cut. More markers, with a non-stick craft sheet and water brush, were used to color the bird. The dies, which perfectly fit around the birds eyes and beaks, were used to cut out those features and pop them up with foam tape. Bring on the dimension! To finish the card I simply added a vintage text circle and some words from a Chit Chat sticker book.

So there you have it..my introduction to this super fun stamp set! Want to give using these birds a try? Click any of the links below to go directly to the product pages. (The Funkie Junkie sells these products for 20% below retail!)

Happy Crafting!

Supplies: