photo kime5_zps3df5231d.png  photo kime6_zpsa90859c6.png  photo kime7_zps9d2ef86d.png  photo kime9_zpsb23b4278.png

Monday, January 25, 2016

Inspiration Wednesday Week 2

Happy Monday! It's a great day to make ART! Today I'm sharing my next Inspiration Wednesday project. Woot! Woot! (See the end of my post for supply list)

This week Donna impressed us with not just another wonderful art journal layout, designed to inspire and encourage, but she also had fun burning some of her pages! Seriously, her videos are so much fun to watch...you just never know what she's going to come up with or what technique she's going to try! The look of the burnt page edges is pretty darn cool...(PS - Always burn near a sink or big bucket of water!)

When I told my kids that I was going to try burning some of my pages, they almost fainted! "Mom!" they exclaimed, "You can't be serious! You're going to burn the house down!" LOL! Thankfully, I wasn't very successful with burning the edges of my pages as the flame would go out as soon as it hit the grunge paste. It was if the grunge paste wouldn't burn...maybe that's a good thing...
This week's lesson was all about paste, glaze, and clusters of goodness. I combined a whole bunch of trinkets on my left page, using an already gelli printed chipboard coaster as the base. That fun light bulb chipboard piece is from Blue Fern Studios...love their stuff! I also added a bunch of other fun goodies, such as a partial tag (see the burnt edge!), buttons, a piece of crinkly plastic, and material. The coaster was embedded into the wet paste and then the other elements were glued on top once the paste was dry, which took overnight.

Donna also experimented with mark making in wet paste. That was super fun and looks amazing once you had the glaze. (I used a combo of Golden paint and Glazing Medium to create the rust color)

The right hand page also featured some pieces of masking tape, also embedded in the wet paste, vintage text, another tag top, and a few other goodies. My sentiment, by Catherine Scanlon, is also featured on this page.
Now can we just stop a minute and talk about the inclusion. Do you see that circle in the middle of the inclusion? Oh man, that makes me do the happy dance. I LOVE it! It was created by accident when I was applying paste to the other side of the paper...this side ended up pressing into the coaster. When I pulled the paper up, that circle was left behind..swoon...Once the glaze was added, it appeared by magic. A few random numbers added to this page and this week's lesson was complete!

This was a really quick project to complete, once the paste was dry. There was a boatload of paste on these two pages and it look almost 24 hours for it to completely dry. 

I hope you enjoyed today's project and if you're interested in learning how to make projects like this one, sign up for Donna's Inspiration Wednesday videos...it's only $35 for the entire year! 

Supplies:
-PaperArtsy Grunge Paste (You can also use molding paste or Wendy Vecchi embossing paste, which is my preferred paste)
-Golden Fluid Acrylics - Quinacridone Nicket Azo Gold
-Catherine Scanlon Stamp - Words of Wisdom 3
-Blue Fern Studios Chipboard


Friday, January 22, 2016

Make Art

Greetings friends! Today I'm sharing a Wendy Vecchi inspired card, featuring oddles of Wendy's stamps, stencils, and inks. No step-by-step today...this was a card I create just for fun to celebrate the release of lots of new Wendy Vecchi products! (You can visit The Funkie Junkie Boutique to pre-order all of the CHA goodies!)

I started this card by creating a background using Wendy's Archival Re-Inkers and Specialty Stamping Paper. See this post on Wendy's blog to see her technique for creating these fun and super easy backgrounds.

Next I created lots of layers by utilizing my stash of stencils. (Full supply list at the end of this post). I use the same ink colors with my stencils that I used in the background. This keeps the background from competing with my main images. My last stencil choice always gets matched with Jet Black Archival Ink for that little bit of pop. (Every creation needs black ink!)

I created the oval window on my card by tracing around a mask from one of Wendy's stencil/mask sets. I use this set constantly!

I confess that the images I used for this card are from an older Wendy set, I'll try to find a link for you. All of my images were stamped in archival ink and then colored with Tim Holtz Distress Markers. The flower image was watercolored with Peerless watercolors. Once all of my pieces were completed, I fussy cut them and added some Glossy Accents to every piece. You can just see the shine in the photo above.

The "shelf" was created by using an Arts Parts piece that was covered with vintage text paper. I stamped over the paper and added some twine and a random metal piece.

Before I assembled my card, I added some stamped leafs in the background, just to add more fullness to the entire layout.

Once my individual pieces were completed, I attached everything with a combination of liquid glue and foam tape. This combo creates great dimension on any craft project. The sentiment was stamped on cardstock and then each word was cut out and attached to the card. Cutting the words apart allows me to put a sentiment in any type of layout I want vs. being tied to the exact layout of the stamp. Some faux stitching, from one of my very favorite Wendy stamps ever, was my finishing touch.

I hope you enjoyed today's card! I'll be back in a few days with this week's Inspiration Wednesday project! Can't wait to share...it's dreamy... Check out the links below to purchase products used on my card.

Supplies:
-Wendy Vecchi Archival Inks (Jet Black, Cornflower Blue, Watering Can)
-Wendy Vecchi Stencils - Polka Dotty, Artful Words, Add a Stencil, Four Spotlight Frames & Masks)
-Wendy Vecchi Stamps - (You can find all of the newest Wendy stamps here) - A list of the sets I used to follow - It's Face Art, Just So Artsy, License Plate Art, Art School, My Kind of Art

Saturday, January 9, 2016

Inspiration Wednesday - Week One

Greeting friends and welcome to my week one Inspiration Wednesday project! If you're familiar with Donna Downey's videos then you may recall a few years ago she used to post a weekly project, titled Inspiration Wednesday. When I first starting working in an art journal, I was obsessed with her weekly videos. Last year she made the videos private and charged a modest fee, $35/year, to see the videos. While I held off on signing up last year, as I had signed up for Life Book. I adored my year with Life Book, seriously a great experience that I would highly recommend, this year I wanted to scale back on how many online classes I took so...Inspiration Wednesday to the rescue! (I like that we get two weeks to complete each project...I can manage that pace!)

This is my project for the first week...and I am crazy about it! This week Donna combined my love of embossing paste, stencils, glazing medium, and (of course) teal paint!

I am working in one of Donna's handmade journals, which are 6"x9", a perfect size for quicker projects and easy storage (or for art on the go). This is actually the last page in my journal as the first few pages already contain various completed layouts. I'm giddy over the aged pages that contain just a hint of color...dreamy. This has to be one of my all time favorite art journal pages. I'll leave you with more photos from my project along with product links, at the end of my post.
I'm not a huge "word of the year" person (see Ali Edward's blog), however, the word grateful is one that has been popping up in my head over and over again this past few weeks so I opted to highlight my word on my first IW2016 project.

My word was tucked in among a variety of papers, tickets, twine, and ribbon.
This page with just three colors dripping down the page...swoon...

This is the opposite side of the inclusion, the other side has the word grateful on it, and this might be my favorite part of the entire piece. This little snippet makes me want to create an entire page filled with embossed number, blue flowers, and orange splotty dots!

I hope you enjoyed today's project! Consider signing up for Donna's Inspiration Wednesday video series so you can see all of the specific techniques used on this, and other, projects. 

You can find the products I used on this project by following the links below:
-Donna Downey Stencils - Mini Numbers Repeat, Artist, and Budding Branch
-Glazing Liquid - Matte


Tuesday, January 5, 2016

Cherish Friends - Texture Pressing Technique


Joyful greetings, friends! I pray that all is going well with you...

Guess what? I made a card! I don't think I've created any cards in months and months...or at least it feels that way. It was wonderful to be back in the studio this week creating a simple card. My inspiration? A technique, highlighted by my friend Dina Kowal, on Splitcoaststampers. Splitcoast! Goodness, it's been even longer since I was posting on Splitcoast...maybe three or four years! No guarantees on whether or not I'll be back on SCS on a regular basis, but it's fun to participate with a challenge and share a card. (You can view my card gallery here).

Last week's technique was called Texture Pressing. You can read the tutorial here. The reason this technique caught my eye? It's one that Wendy Vecchi has taught for years! It's a perfect technique to use with her Embossing Paste. This is a super easy technique, but I grabbed a few photos to share of my progress.
There are a lot of pastes on the market now, but Wendy's remains my favorite. I use it almost every time I create. It's lightweight, fully flexible when dry (it won't crack or chip!), provides amazing height and texture vs. some other pastes that dry rather flat unless you use a lot of paste, and takes color from any medium - paint, re-inkers, ink pads, you name it - perfectly!

To start my project I spread some embossing paste on a piece of scrap cardstock. To create the texture, simple press a stamp into the wet paste. I used a variety of designs in my paste...just for fun. Set the paste covered paper aside to dry completely.

Here you can see the image that I pressed into my paste...this great net image from an older Wendy Vecchi stamp set, Art Gone Postal. (All product links at the end of my post)

Once my paste was dry I simply colored the paste with a few Distress Inks. I used Shaded Lilac on the middle and Seedless Preserves on the edges. The very dark areas are ones that don't have any paste...it's just cardstock. I love the color difference and the way the darker ink gets picked up on the paper. I also gently went over the entire piece with Gathered Twigs.
Here are the three main elements of my card; the texture pressed piece of cardstock, a flower from the Wildflower Art set, and a die cut circle, which has also had a bit of Gathered Twigs added to the edges. (The flower was colored with Faber Castell Big Brush Markers and a water brush).
To finish my card, I added a piece of silver painted cardstock behind the textured piece, added faux stitching, a stamp from the Just Sew Artsy Wendy Vecchi set, to a few places on my card, and added the sentiment, which was taken from a Tim Holtz Chit Chat sticker book. And there you have a quick and easy card that utilizes a quick and easy technique!

Why don't you give texture pressing a try? I'd love for you to share a project with me! Just leave me a comment with a link back to your blog and I'll stop by for a visit!

Happy crafting!

Supplies:


Thursday, December 31, 2015

2016 Product Guide - Art Foamies, Gelli Plate Printing, and More!

Hello friends and happy new year! I'm wishing you the very best for 2016! Today I'm sharing some highlights from this year along with some of my new favorite products...you know, so you can start those 2016 shopping lists!

I can hardly believe that 2015 has already come to a close. Maybe it's just me, but it seems that the older I get the faster that time passes. This has been one of the most interesting, challenging, and unpredictable years for me personally and our family. Here are some highlights (I'm feeling a bit wordy tonight so feel free to scroll past the personal stuff!):
  • Selling eclectic Paperie to The Funkie Junkie - This was both a hard and an exciting decision. I loved, loved, loved owning a store...it was a dream come true. The connection you make with people who share a common interest in art combined with the ability to be immersed in creative endeavors each day was an incredibly rewarding experience. However, the toll that being the primary person responsible for every aspect of owning a store was all consuming, which is great if you're a single person, but is a real challenge if you have a family. That aspect, combined with the harsh reality that you spend much more than you make when you own a small business, made the decision to sell one that needed to be made. While I still do fantasize about owning another store, I have no regrets about moving on and am thoroughly enjoying my free time.
  • Job Loss - Almost 20 years with one company, half of that time spent working from home, and my sweet husband got laid off. It came as a complete shock. While there were rumblings of layoffs, my husband's group had never been affected by previous layoffs. This time his team was reduced by 30%...basically the people that had the highest salaries and who had been with the company the longest. What's sad, and is still sometimes hard to stomach, is that there were some in his group who probably should have been fired...and they were safe...and then my husband, who had nothing but glowing reviews for 17 years was the one selected. Of course we know that these circumstances don't happen outside of God's providence, but the sting of those decisions can still sometimes be felt. Now we're getting used to an entirely new routine, where my husband is no longer working from home and I'm the main caregiver to my children. It's been a challenging (I miss my hubby) and rewarding (I feel closer to the kids) experience. He loves his new job...but I'd take him working from home again in a NY minute!
  • Moving - Wow...that was a biggie and completely unexpected! We've been in CT almost a month now and we're starting to feel a little more settled, but I miss NH like crazy! I LOVE NH and loved living there...I never thought that I'd live anywhere else. What's funny is that my husband and I often talked about moving to a less expensive area (PS - CT isn't it! LOL!), but the reality of moving is far different than having conversations about it over the dinner table. There are a few important things I've learned about myself in this process (and not all of it good!). I'm not as grateful as I should be and I complain far too much. My husband was unemployed for almost seven months and he found a job...a good job...one that he really loves. And instead of being grateful, I've found ways to complain about it too often. I routinely teach my children to be thankful, and yet, in my private thoughts and conversations with my ever patient husband, I grumble. In 2016, I'm going to try very hard to be really, truly grateful for God's blessings...and there are blessings...too many to even name, even when you have to leave everything behind. We don't know what the future holds for us in CT, or if we'll move again, but we are trusting in the One who holds the future...firmly...in His capable hands. 
And, with those three highlights from this year...let's get on with the product enabling for next year.....You're welcome... :-) (These photos also represent some of the goodies I've been playing with during our Christmas vacation...)

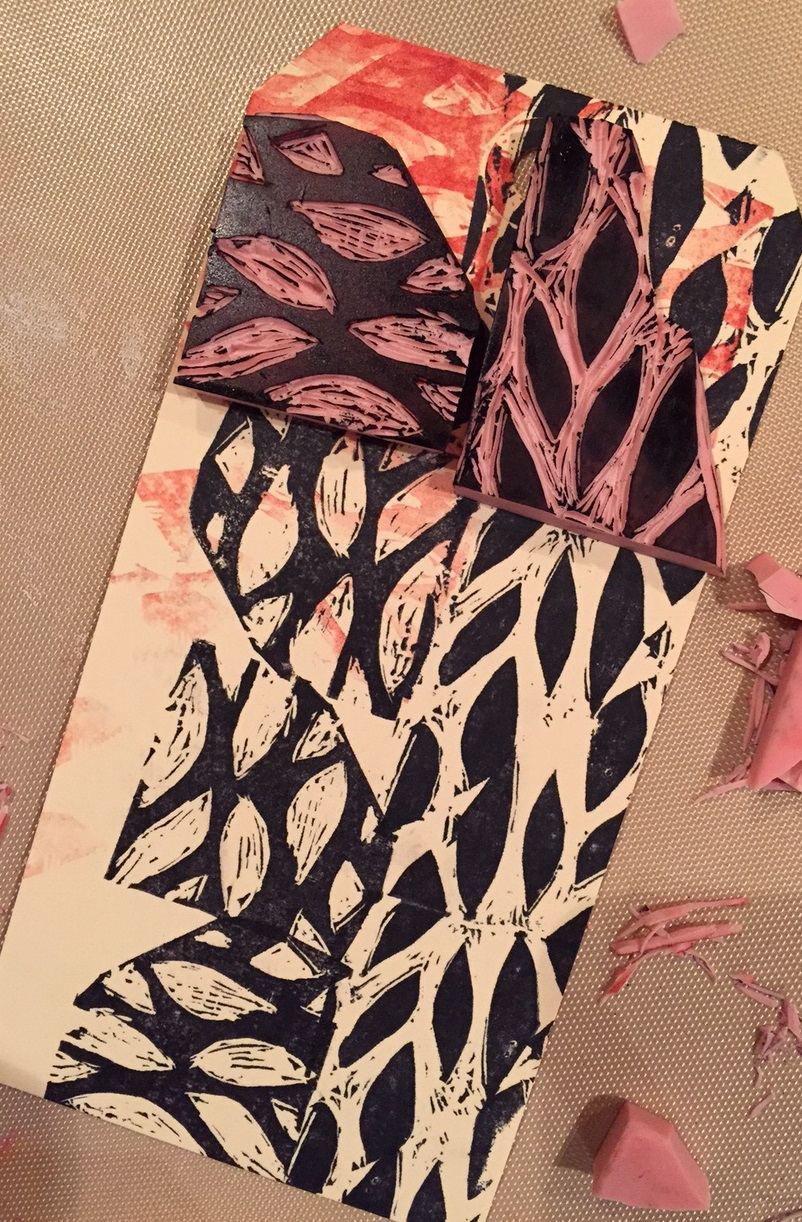
Number one on the list...Stamp Carving! I've followed Julie Fei-Fan Balzer's stamp carving adventures for a few years now, but never felt compelled to carve my own stamps until a friend had me over for a stamp carving gathering. One stamp in and I was hooked! I went out and ordered all of the supplies, watched videos, and have jumped in with two feet. It's a super easy process, although can be time consuming, and the results are so much fun! My kids have even created their own stamps!


My nine year old made these stamps! We simple traced a stencil design, from Dina Wakley, Leafy, and he spent a good hour carefully carving out the stamps. He loves them and has even starting to create his own art journal. How cool is that!?
This was a stamp I created while hanging out and drawing with the kids. I wasn't really trying to be super careful or precise, but I still loved the results. I love the look of those lines (basically areas that could still be carved away) around the flowers...so vintage!
How cute is this one?! This is a stamp I carved for my 11 year old...it's a little Yokai (think Pokemon) figure. He was so excited with the finished product and I can just see him stamping this little guy on any outgoing mail!

Want to try stamp carving? Here are some helpful links to the products that you'll need:
-Julie's CarvedDecember Projects (for inspiration!)
-Julie's Book, "Stamp, Carve, Play"
-You'll also need a ruler, ink pads, and ballpoint pens or Sharpies

Next up...Gelli Plate printing!

Gelli printing is so much fun! You can create all kinds of custom background, using just acrylic paint, stencils, and even household items. I finally purchased some deli paper (link below) and spent an evening creating a bunch of prints. The prints below were all made using the exact same color paints and the exact same stencils. Can you even believe how different they look? I can't wait to use these pieces in my art journal and to create cards...love! (The one in the lower and upper right are my favs...)

Want to explore gelli printing? Gelli Arts shares a ton of great videos on their You Tube channel and their Facebook page. Check out the following links:

-Gelli Arts (They just introduced some mini plates that are to die for...I'm giddy!)
-Gelli Plates at Dick Blick
-Brayer (a must have item)
-You'll also want to have stencils, acrylic paint, and any other mark making tool on hand

Third on the list...and a new product for me...Art Foamies! Art Foamies are very sturdy foam stamps. Each stamp comes with a stamp buddy, which can be used to create custom ink pads, utilizing acrylic paint. The Art Foamies are great for use in art journals and even on walls! They are super fun! And...Julie Balzer just introduced her own line of Art Foamies...so you know I had to get a few.

This is probably one of my favorite designs and the large size is perfect for art journals. For these pages I started by painting them with black acrylic paint. Once that I was dry, I loaded up my stamp buddy with two colors of Dina Wakley paint. (Tip: You're going to need a lot of paint to fully load the ink pad). Once the pad is loaded with paint, press the Art Foamie stamp onto the ink pad and stamp away! It took a little practice to figure out how much pressure to apply to the stamp....as evidenced by some of my smooshy images. I found that you do not need to press hard, but you need to apply gentle, even pressure to the entire stamp. I think I'll probably add some gel pen doodling to this page...
I also stamped a bunch of the same image on to deli paper. You can see how many impression you can get from the one ink pad. You can even get multiple prints from one application of paint. I did all of the stamping in my journal and on a bunch of pieces of deli paper and I could have kept going! (Tip: Be sure to rinse your stamp and stamp buddy with water before the paint dries!)
Here's another of Julie's new designs. Since I was just playing, I stamped this sweet flower all over two art journal pages. We'll see what I end up doing with these pages in the future...

Want to check out Art Foamies?

-Julie Balzer Video on using the Art Foamies

This is just a quick little project, featuring paint that was left on my gelli plate and packing tape. This just might be the best and coolest way to clean your gellli plate! You have to check out the video here.

Lastly, I'll leave you with two photos that I just have to share...
First, the art journal covers my youngest created for his art journal. In the past I've mentioned Julie Balzer's Junque Journal class and how much I enjoyed creating my own journal. My youngest liked my journal so much that he wanted to create his own. I took a bunch of left over pages, from when I created my journal, and made one for him. I just love his pictures and his excitement over wanting to create art.
My oldest is all about video games and all things Pokemon. His favorite art form is to trace print outs and then add color. This picture doesn't have color yet, but he has a great collection of this type of art and it's fun to see him engage with drawing and shading.

Whew! You still with me? This was a long post! I wanted to share some of the projects we've been working on during our vacation. We're back to school and work next week...back to our regular routine. I hope you enjoyed seeing a few of my favorite things and I hope to be back with a finished project next week!

Best wishes for a very happy new year!


XXOO

Saturday, December 26, 2015

Christmas Art Journal

Hello friends and happy holidays! After a very long silence on my beloved blog, I'm actually back with a project! And I even turned it into a short photo tutorial...shocking! LOL!

Our family is finally settled in CT, and while I can't say that I feel 100% "at home," we're comfortable in our new house and enjoyed the Christmas holiday with family. (We even packed in a day trip to NH last weekend to celebrate with our church friends)

The new house is fully decorated and we just need to hang a few more curtains before calling it quits. The unpacking seems to go on forever... My new craft area is actually part of a huge loft that also contains our guest bed, the boys Legos and toys, and our school area. I have one large enclosed cabinet and one bookshelf for my supplies. And because we're in a rental, I opted to only unpack supplies I felt that I'd use on a regular basis. (Everything else is in bins that I can easily access, if needed) 

Because the loft area is multi-functional, I don't have the freedom to leave all of my supplies out on a table like I did when I had my own space. While this initially had me feeling like I never wanted to create art again (translation - I've been feeling very down about our move), I realized it actually helped me be more purposeful when I create. Rather than being overwhelmed by everything sitting on my desk and around me, I now need to think through what I want to make and what supplies I'll need...reminding myself that if I want anything that is still packed, I'll need to go searching through bins. The need to be mindful led me to really sit and think through what I wanted to create yesterday. I knew that I wanted a holiday theme, and I wanted to use Christmas tree ornaments. Creating a mental list of supplies before I started meant that my art journal spread came together pretty effortlessly. It felt really great to begin and finish a project, after doing nothing for so many weeks. I even commented to my husband that I felt the desire to be back on a design team...maybe this is a good sign for my emotional state. :-)

Without further delay...here are more photos of my project, along with the link to the video. The supply list is at the end of the post. Enjoy and thanks for hanging in there!

One thing I didn't mention in my video is that I used the Brushed Pewter paint to add silver to the edges of each ornament.


Supply List:
  1. Wendy Vecchi white embossing paste
  2. Distress Paint - Spun Sugar, Brushed Pewter, and Seedless Preserves
  3. Tim Holtz Stencils - Flourish
  4. Jet Black Archival Ink
  5. Faber Castell Big Brush Markers - Cool Gray
  6. Ranger Matte Medium

Thursday, November 12, 2015

Art Journal Every Day


Hello friends! My apologizes for the long silence and lack of blog posts. To say that life has been busy is an understatement. So much has been taking place over the past month that it's been difficult to create much less remember to take photos and post on my blog. Relax...this is going to be a long post.

Today I'm sharing the only art that I've been creating over the past few weeks, along with details on some major changes taking place in our family. First, let's get to the art!

Early last month I ended up signing up for Julie Fei-Fan Balzer's Junque Journal class, which is offered online. It's $125 for the class, but so worth the price! I think I mentioned this class previously, but I ended up taking close to 100 random pieces of cardstock, paper, half finished art journal pages, and lots of other odds and ends and turning them into two journals. They are spectacular! I can't say enough good things about this class...it was amazing.

Once I finished my journals, I ended up taking Julie's 30 Days in Your Junque Journal class (another online class), which includes 30 individual videos. Each video shows Julie's creating something in her journal each day. To be honest, I wish there was more of Julie creating her beautiful art in her journals (I could sit and watch her videos all day!), however, she does really break down how she uses her journal and how to get the most out of your journal. I felt like I learned a lot of tips and tricks attending both of these classes. (There's a discount if you bundle these two classes together)

Since the majority of my art studio has been packed for our pending move to CT (insert weeping and wailing), I've been only working with paint, some stencils, a whole lotta new pens (Julie has me hooked on Jelly Roll pens and white Sharpies!), and my journal. It's been refreshing...

I have also found that my journal has been a wonderful way for me to work through my many varying emotions about our move. Moving is not something I have desired and so there have been many days filled with a deep sadness and feeling of loss. We are giving up a lot to make this move. Journaling has helped me put those feelings down on paper, it's been a place to capture encouraging words that have been spoken to me by friends, and a location for special Bible verses that I've read. It's been a rewarding and somewhat therapeutic experience. 

The journal spread above was created with red paint (Dina Wakley), a leaf stencil (Crafters Workshop), and some embossing paste (Wendy Vecchi) that I colored with gold paint (also Dina). I put my journaling on two small tags, I love the look of the text against the red pages, and the butterfly was a scrap piece of chipboard left over from a die cut (Sweet 'n Sassy). I just added some paint and stamping (Prima stamps) to the chipboard before attaching it over another manila tag.

This page already had a gelli print on the paper (you can see the print through the bird), and I just added black paint around the bird mask (Donna Downey), poured out my thoughts on the page, using a white Sharpie, and added some red color to the bird. I also did a bit of doodling (love those Jelly Roll pens), and a piece of washi tape. I might add more to this bird, but no rush on making any changes right now. I'm finding that I work in small sections once or twice a day. It's all this mom has time for right now!
The page on the left was one that I created a while ago, you can read the details here, and I simply painted the page on the right to match. I journaled in the circles (fun stuff!), and added a few other elements to make the two pages flow together.
This spread was super, duper fun! The hearts on the right were already on the page and then I started doodling...and I just couldn't stop! I created this giant flower and used some watered down gesso to fade out the background behind the hearts, but left some of the text and design peeking through. The doodling was all done with Jelly Roll pens and Sharpies. The hearts were the perfect focal point for my journaling as my pages included a wonderful note from a friend who encouraged me about the decisions we're making as a family. (All of the date, day, and shape stamps are from Julie Balzer).

I have a few other pages that are in progress and hopefully I'll be able to pop back in sometime soon to share more.

As for our personal news...we are indeed moving to CT. I'm more at peace about the decision now as each day brings more conversations with my hubby, more news about his new position (he LOVES it), and closer to finding a new home. We've been faced with a host of challenges with this move, but we're finding that God is continuing to open doors so we've been encouraged that we're on the right path. We hope to close on our new home this week and we will be out of our beloved NH home right after Thanksgiving. 

This also means that I will no longer be teaching at Michaels in Epping or offering classes in my home. It's a bit sad to be closing this chapter of my life, but I confess that I have been overjoyed with the amount of free time I've had with my children. Being free from the stress of store ownership and creating only for classes, design teams, or my blog vs. creating just for fun and only when I have time has been liberating. I have missed so much with my boys...even though I've been home with them for many years...I haven't been as present as I should have been, and I'm grateful that I'm getting an opportunity to spend more time with them now...it's a tremendous privilege and blessing. 

I'm not sure what all of this means for my blog...I do know that things are going to be very quiet for the next month or so as we pack up the rest of our house and then unpack in our new home. I may share more art on Instagram so please follow me there, if you'd like. My user name is Kimita46. (You'll also see lots of photos of our cat! LOL!) I'd like to think I'll be back to regular blogging in a few months, but we'll see...I've been on design teams and blogging for close to 10 years and a big part of me wants to take a break and just work on my own art. However, I may miss this wonderful community too much to stay away for long! I do hope you'll remain on my mailing list for now and if there are any other big changes (you know, other than that whole moving to another state thing), I'll send out a note. (Maybe I'll share more of our moving journey on the blog...)

Thanks so much! Much love!