Wednesday, October 31, 2007
It's My First justjohanna!!!
Get ready for a bunch of justjohanna posts! The design team I'm on creates samples for wholesale orders, meaning the cards the team makes are included with orders of justjohanna stamps, to be used as samples at retail locations. Therefore we need to wait awhile before posting our samples. We just got the all clear today to post the samples we created back in September and I'm so excited to share!!
One of my favorite things about being on the design team is that most of our assignments are much like challenges - at least to me - in that we are given a list of stamps that must be used on our samples and we're not to use any images not on the list. Well when one of the assignments is for one cupcake and one sentiment...that presents a challenge for me! LOL! But you know what? I LOVE it! I have had such a great time working on the jj team...it's been a blast!
OK - enough of my bragging on justjohanna! ;-) The cupcake was colored with my Copic markers and then cut out as was the "for you", which I also traced with a marker to give it a bit of color. I used my Cuttlebug to create a small band of textured paper and attached that to a Pumpkin Pie card base. The chipboard circle was covered in paper from a SU! Scrappin' Kit and then sponged with some Pumpkin Pie ink. The tag is actually a sticker from the same Scrappin' Kit and that was slid under the cupcake, which had been attached to the circle with dimensional tape. The "for you" was added to the tag as well as an antiqued picture hanger and brad. A small piece of Pumpkin Pie ribbon was added to the hanger to finish off the piece!
Stay tuned for more cupcake cards tomorrow...
Enjoy and happy snacking! ;-)
Supplies:
All images by justjohanna
Ink, cardstock, embellishments by Stampin' Up!
Coloring by Copic Markers
Wednesday, October 24, 2007
SALT Bi-Weekly Challenge - JESUS IS LORD
This week is was Kimberly's turn to present us with a challenge and this week's theme on the SALT blog is JESUS IS LORD!
"I (Kimberly) chose this because this is the start of our journey with God, acknowledging Jesus as our Lord and becoming born again! The wonderful thing is that it is so easy to join God's kingdom! If you confess with your mouth, JESUS IS LORD and believe in your heart that God raised Him from the dead, you will be saved. For it is with the heart that you believe and are justified, and it is with the mouth that you confess and are saved." - Romans 10:9-10
Staying true to my design "style," I waited until the night before the due date to create my piece! :-) Not having an idea to start from I went to my Bible and found the perfect verse in Philippians 2:11:
"Therefore God has highly exalted Him and given Him the name which is above every name, that at the name of Jesus every knee should bow, of those in heaven, and of those on earth, and of those under the earth, and that every tongue should confess that Jesus Christ is Lord, to the glory of God the Father."
I started with some Basic Gray paper (can never go wrong there) and taking a few clues from a new Paper Trends book I recently published I added a scalloped border around a piece of 6"x6" BG paper. The border was created by using a SU! slit punch. My verse, which was printed on a piece of pale yellow vellum, needed a resting place so a plain piece of BG was added, layered on Pumpin Pie cardstock, to serve as the vellum's anchor.
When one needs a fantastic embellishment where else do you reach but for a giant Prima flower, which fit perfectly. I did add a stamped SU! flower in the middle of the Prima, along with a giant brad for some additional dimension. And speaking of dimension, what about that faux ribbon at the bottom of the card? How cool is that?? Found the idea in the above mentioned Paper Trends book (Julie - it was a good purchase!!) :-) The "ribbon" is made out of two pieces of Crate paper and the star covered in gold wire was the finishing piece.
All of us at SALT would love to see what you come up with based on this challenge! Leave a comment here or on the SALT blog with a link back to your creation!
Enjoy and happy creating!
Thursday, October 18, 2007
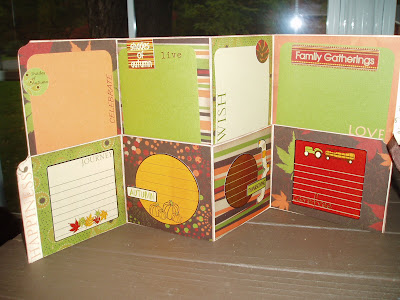
Folder Album
**Front of closed, completed album**
**Inside of album**
**Backside of album (I couldn't not decorate it!!)**
My apologizes for my sporadic posting over the past month or so. It seems that most of my evenings have been jam packed with activities, leaving me little time for fun stamping and blogging! But I hope to make up with it with this nifty folder album, the idea which came from Taylor over at Taylored Expressions. She was kind enough to post a tutorial on how to make this on her blog and kind enough to personally walk me through one of the steps I didn't quite understand! (Thanks Taylor!!)
This sample was made for the next class I'm teaching at Wholly Scrap (if you're local, stop by and say "Hi" or join us for the class!) The class is called "What Would MacGyver Do" and focused on creating with supplies you can find around your house, such as a manila folder!
I loved the end result of this folder and intend to make more! This would be a great way to capture a few photos from Christmas morning. Wonderful gift for in-laws or grandparents too! It was super easy to make, especially since I used stickers and rub ons (first time using rub ons and can I tell you that I am IN LOVE with rub ons! Oh my, they are just fantastic and fun!!). The most time consuming part of this project is the cutting of the cardstock and aging all of the edges of the exposed folder. I think using more ribbons on the pull outs would be fantastic as well.
Really fun project, why not give it a try?! (Check out Taylor's album too - it's amazing!)
Happy Creating!
Wednesday, October 10, 2007
SALT Bi-Weekly Challenge - CREATION
This week it was my turn to set the challenge on the SALT blog and I chose:
Creation
We see God's sovereignty in His creation each and every day, from the beauty of nature to the miracle of birth. God has lovingly and mercifully created all that we see, hear, smell, touch, and feel, to bring glory to Himself and to bless His children. The verse that inspired my challenge choice is from Isaiah:
"For thus says the Lord,
Who created the heavens,
Who is God.
Who formed the earth and made it,
Who has established it.
Who did not create it in vain
Who formed it to be inhabited
I am the Lord and there is no other."
-Isaiah 45:18
I created a "Six Days of Creation" card set, which contains six mini cards (3" x 2.5") in a paper box. You can view a close up of the six cards, each representing what God created on each day, below: (The creation account can be found in Genesis 1)
Day One - Light:
Day Two - Heaven (also translated Sky):
Day Three - Earth (land) and Seas & Vegetation: (I only had room on my card for Land!) :-)Day Four - Sun, Moon, & Stars
Day Five - Animals:
Day Six - Man:
And on Day Seven...He rested! :-)We'd love to see what you create based on this week's theme!! Please either leave a comment and link back to your blog or gallery on my site or hop on over to the SALT blog to see what the other team members have designed and leave a comment there. We'd love to share in your "creation!"Enjoy!
Sunday, October 7, 2007
The Winners!
World Card Making Day was so much fun! A great BIG thank you to everyone for your wonderful entries on the justjohanna challenges.
The winner of my "Shabby Chic" challenge is Suzann! Suzann - you will receive a limited edition "Flying Al on Earth" stamp from justjohanna.
You can see Suzann's here. (Suzann completed an amazing number of challenges on WMCD and you can see them all on her blog.)
Additionally, justjohanna administrators are collecting all names from all challenges to go into the drawing for:
-One Grand Prize of $ 250 justjohanna shopping spree
-One $ 50 justjohanna shopping spree
-Five 25% off your order coupons for justjohanna web site
Winners will be announced on justjohanna's forum.
But wait there's more...
Now for the Paperie Petals WMCD prizes!! Thank you to everyone who participated in the Shabby Chic challenge! I really enjoyed seeing all of your beautiful creations!
- Vanessa - You have won the 9pm prize of the chipboard pieces, bag of tags, and ink pads!
- Zarah - You have won the 10pm prize of the marker, black hemp twine, and stamp!
- Cheryl - You have won the stamp set!
All of the winners must contact me at ksdm@comcast.net and provide me with your address in order to receive prizes. A HUGE congratulations to everyone who won!!
Saturday, October 6, 2007
WMCD - Shabby Chic Challenge Three
It's my last challenge for the WMCD Extravaganza! You can have your choice with this one...either create a card, where you beat up and age your paper, or create a card using a toile background. What can be more Shabby Chic then toile! :-)
The toile paper I used is from an old Stampin' Up! pack of paper...back before double sided paper (gasp) was all the rage! I toyed with keeping this card completely monochromatic but just couldn't resist coloring in my little partridge girls!
The card base in vanilla with pomegranate and toile layers. The edges of my toile paper has been notched so add space for my antique pewter brads. A satin ribbon, in matching pomegranate, was added. Then more pomegranate and toile! The square with the four circles is actually a piece of chipboard, covered in the toile paper. The justjohanna partridges have been colored with Copic Markers, cut out and attached at various angles in the circles. (Did you know that many of Johanna's images include a right AND left facing image? How fun is that!) The darling "Merci Bird-coop" was added to the front and attached with stampin' dimensionals and of course everything was aged!
Viola!
Final prize of the evening!! A stamp set!!
This is a beautiful three stamp set, with images that would be just perfect for creating Shabby Chic cards!! Don't forget to add links back to your creations!!
PS - Since I've posted three challenges, under the Shabby Chic "heading", I'm going to give everyone who would like to participate an extra 24 hours to create and post a link. ONLY my prizes will be awarded and announced on Monday (10/8)!! **NOTE** The winners of the justjohanna prizes will be choosen at the close of the Extravaganza.
WMCD - Shabby Chic Challenge Two
Try some sewing on your card! I totally stink at sewing, can you tell? But I love the lines all crooked and going every which way...it's so...Shabby Chic! And how about that paper? It's so yummy that I couldn't even bare to cover it up with an image! My only stamping? The justjohanna "thanks ever so" stamp!
This card was created with a chocolate chip card base, which was then layered with a very pale pink. The floral paper was sewn onto the pink and then the edges were aged, of course! I added the lime green paper under the floral, along with two antique brads. The beautiful two-tone ribbon was added across the top of the card with another piece of antique hardware that is holding my sentiment.
The challenge this time around...if you're still up for creating another card in under an hour....Try sewing! If you don't have access to a sewing machine then go for using floral paper and only a sentiment to create your card.
Don't forget to leave a comment with a link back to your creation!! That's the way to get entered into the drawing for prizes! Speaking of prizes...here's the 11pm EST prize:
A marker, with fine tip and paint brush ends, a stamp (says "sweet stuff"), and a package of black hemp twine!This card was created with a chocolate chip card base, which was then layered with a very pale pink. The floral paper was sewn onto the pink and then the edges were aged, of course! I added the lime green paper under the floral, along with two antique brads. The beautiful two-tone ribbon was added across the top of the card with another piece of antique hardware that is holding my sentiment.
The challenge this time around...if you're still up for creating another card in under an hour....Try sewing! If you don't have access to a sewing machine then go for using floral paper and only a sentiment to create your card.
Don't forget to leave a comment with a link back to your creation!! That's the way to get entered into the drawing for prizes! Speaking of prizes...here's the 11pm EST prize:
Sew sweet!!
WMCD - Shabby Chic First Challenge
It's here!! My justjohanna, three "power hour" WMCD Extravaganza challenges!
My challenge is "Shabby Chic"....I describe Shabby Chic as anything "aged, crumpled, torn, sewn, and covered in floral patterns!"
Four other justjohanna design team members are also posting challenges from 9pm-midnight, they are:
Julie Prichard – paint http://thelandoflostluggage.blogspot.com/
Kathi Rerek – slide mounts or frames http://kathstales.blogspot.com/
Kim Frantz – color blocking http://papersquares.blogspot.com/
Teresa Abajo – printed text http://thetamarisk.blogspot.com/
My challenge for the 9-10pm EST challenge is to create a "shabby chic", antiqued tag. My interpretation of the challenge is above.
To create my tag I traced around an existing chipboard tag, creating a base of Always Artichoke. I next layered this yummy brown patterend paper - kind of looks like old wallpaper, doesn't it? Both of these layers are wrapped in a lacy artichoke ribbon. I then stamped my JJ flower on vanilla cardstock and colored with Copic Markers before cutting out. I then aged the flower edges and curled the petals around my piercing tool. I then cut out a second flower, coloring and cutting out just the top portion of the flower, which was then layered on top of my fist full flower, to create a 3-D effect, see photo below. I also colored two of the flower petals in a dark green to act as leaves on the stem. A so cute saying was added, as well as a mustard eyelet and fuzzy string!
Now it's your turn!! Quick....go create a tag, using any stamps you'd like -using justjohanna stamps would be great too, if you have them! Post a link in the comments section of my blog and/or on the justjohanna message board. At 10pm EST I will do a drawing for the following:
A bag of white and vanilla paper tags, a bag of chipboard, and two mini craft ink pads.Go create!! :-)
WMCD Questions
Please feel free to post any questions you might have about today's justjohanna WMCD Extravaganza! I'll do my best to respond with an answer quickly.
Diane asked if challenge participants can submit cards that are any size, for example an ATC card size (2.5" x 3.5"). The answer is YES! You can submit any size card!
Here are a few other answers to prize questions:
1) I will award three prizes, one an hour, during my WMCD time slot - 9pm EST - midnight.
2) justjohanna will award challenge participants, whose names will be drawn out of hat during the entire day, a collector's edition WMCD stamp.
3) At at the end of the day (10/7 around the world), all of the challenge participants names will be put into a hat and one winner will receive a $250 justjohanna gift certificate, second place will win a $50 certificate, and third place will win a $25 certificate!!
Feel free to contact me with other questions...Looking forward to playing tonight!!
Friday, October 5, 2007
Don't Forget....
Tomorrow is World Making Card Day and justjohanna has a HUGE extravaganza planned for the entire day!! Be sure to check the justjohanna Forum as soon as you awaken to check in on the posted challenges. Prizes will be awarded all day, with a grand prize being a $250 justjohanna gift certificate!!
My challenge time will start at 9:00 pm EST and run until midnight. Three challenges will be posted and I'll be personally awarding my own prizes to those that participate in the challenges! All you need to do is check in at 9pm for the first challenge. You'll have an hour to create and post, adding a comment, with link back to your blog...I can hardly wait to see what everyone comes up with!!
Really looking forward to sharing with everyone!!
Wednesday, October 3, 2007
justjohanna Design Team Call!
The justjohanna design team is refreshed every six months with a call for new designers. They are accepting applications beginning October 3, 2007, and the final date they will be accepting applications is November 10, 2007. Read all about it on Johanna's blog!!
Tuesday, October 2, 2007
Copy, Copy, Copy!
When it's close to midnight and you need a card for the following morning, what do you do?? CASE, baby! ;-) The beauty shown above is a copy of a card that was in the most recent Stampin' Up! On Stage magazine, which lists award winners for a set time period. (Deb, over at Thinking Inking - if you haven't been to her web site...go now...she's amazingly talented - won one of the 10 SU! Artisan Awards! Go Deb!!) Anyway...I used different colors on my card but I confess that I even used the same stamp set as the card in the magazine! So zero credit for me on this lovely creation but thought I'd share just how talented those Stampin' Up! ladies are! ;-)
I will, however, share how I created the card...The base is Very Vanilla and the size is 6" H x 4" W. The tab is simply traced freehand and cut out. I aged all of the edges of the Vanilla before adding any top layers. The top of the card is Kraft paper and it has been aged with Basic Brown and Really Rust. I then used the saying stamp to randomly stamp all over the Kraft paper. The edge has been tored and aged before attaching to the top of my card. (The open space between the two pieces of cardstock has been sponged with More Mustard.) The bottom portion of the card has been stamped on another piece of Vanilla before being torn, aged, and attached. I then stamped three of the flowers on Vanilla, colored them with my Copics, and cut them out. Used a copper brad in the middle of each flower, bent the edges a bit to give them a little more dimension, and attached each one with a stampin' dimensional. The word "believe" was stamped on the tab.
Love the end result and send a great big thank you out to the gal (since I don't personally know her I don't want to post her name, without permission, for all the Internet world to see...she might not want to be famous) ;-) who created this beautiful card!!
Enjoy and I may just be back with another copy tomorrow... ;-)
Supplies:
All stamps, ink, cardstock, and embellishments by Stampin' Up!
Monday, October 1, 2007
Happy!
Just heard that a friend is expecting baby number three! Made this card for her to say, "congratulations!" This is a CASE from a card found in the most recent Stampin' Up! catalog. I used a different stamp set and paper colors but the layout is the same.
I used the "rock and roll" technique for each flower. Just in case you haven't heard of this technique; you stamp a solid image in your first color and then "roll" the edges of the stamp in a second darker color. I love the effect! I then added the middle part of the flower and embossed in a dark brown. A brad smack dab in the middle finished off the flower. The "happy" sentiment is stamped in Always Artichoke (on top of Always Artichoke cardstock). Each flower has been mounted on a 1.5 x 1.5" square of Very Vanilla. A row of piercing runs underneath the flowers. A small piece of brown grosgrain was added to the side, with a small bit of double stitched ribbon was added on top.
Happy news, happy card!
Supplies:
Supplies:
Stamps, cardstock, ink, brads, and ribbon by Stampin' Up!
Subscribe to:
Posts (Atom)